Showing posts with label cookies. Show all posts

Sunday, December 4, 2016

Gingerbread!


It's beginning to look a lot like Christmas! Facebook posts galore. There's a tree on each profile page, photos of tablescapes. I'll get behind if I don't find decor!

At least, that's how I felt this weekend. I had already planned to hang ornaments on my little Christmas tree when the week finally came to an end, but after seeing how far along my Facebook friends and real-life neighbors were in getting their Christmas spirit on, I felt it was time to do some holiday decorating and spontaneous Christmas activities of my own. I decked out my front yard tree in lights, watched a Yule Log video on Netflix, and decided to bake gingerbread cookies!

Now I've made gingerbread cookies before, but I didn't know if my experimental take on a recipe from childhood was necessarily the best gingerbread cookie recipe out there. Also, I love finding tried and true, tested recipes online. So I did a web search and stumbled onto The Most Wonderful Gingerbread Cookies on Food.com (special thanks to gingerkitten D for the post). I chose this result because the recipe had five stars, and I had all the ingredients.

It's a good thing I gave it a try--these cookies were delicious! Not too hard, not too soft, and the perfect amount of sweetness whether you frost them or eat them straight out of the oven! It fulfilled my craving for gingerbread and for holiday cheer--I even made my first (terrible, tiny) gingerbread house! Now you can make one too!

Ingredients:

3 cups all-purpose flour (I used self-rising flour since I had it)
1/4 teaspoon salt (I put in just slightly less)
1 Tablespoon ground ginger
1 and 3/4 teaspoons ground cinnamon
1/4 teaspoon ground cloves
6 Tablespoons softened, unsalted butter
3/4 cup brown sugar
1 egg
1/2 cup molasses
2 teaspoons vanilla

Directions:

1.) In a medium-sized bowl, sift together the flour, salt, ginger, cinnamon, and cloves, stirring to combine. In a separate, larger bowl, beat the butter, brown sugar, and egg with an electric mixer on medium speed until the ingredients are thoroughly combined. Add in the molasses and vanilla, and continue to blend.

2.) Slowly add the dry ingredients to the wet ingredients in batches, beating with the electric mixer to combine until the flour disappears each time (be careful as the flour and the batter are likely to fly out of the bowl!). Once the flour is all incorporated and no longer visible, make sure the dough is just sticky enough to form into a small lump (I added a couple of Tablespoons of milk to help). Divide the dough in half and wrap each lump in plastic cling wrap to sit out at room temperature for about 2-3 hours.

3.) Place one lump of dough onto a sheet of parchment paper and begin to roll it out with a plastic rolling pin sprayed with nonstick cooking spray. Once the dough is flat and thin (about 1/4-inch thick), you can cut out your cookie shapes with your favorite gingerbread men or other cookie cutters. Place them on a sheet of parchment paper about an inch apart each and then freeze for approximately 15-20 minutes to help keep them from spreading in the oven.

4.) Preheat the oven to 375 degrees. Transfer the parchment paper with the cold cookie dough to a baking sheet and bake the cookies for approximately 7 minutes (watch them carefully so they don't burn!). If you want to make a gingerbread house, save the second lump of dough to roll out and cut into squares (dough should keep in the fridge for up to four days if you're too tired to make it all at once, like me). Remove the cookies from the oven and let cool on the baking sheet for 2-5 minutes before transferring to a wire rack to cool completely. Once the cookies are room temperature, you can frost them with your favorite colored icing.

I should warn you that making gingerbread cookies is pretty time consuming (you have to wait for the dough to sit at room temperature, wait for the cookies to chill, wait for the cookies to bake, and then wait for the cookies to cool to room temperature again so you can frost them without melting the icing). BUT, I will say they're totally worth it. I gave away non-iced but fresh-from-the-oven cookies to friends, went out to watch football, and came home to room temperature cookies I could frost and eat immediately.

Christmas cookies always feel festive, but gingerbread just has that extra special holiday feel. And despite the time it takes to make them, they're actually quite easy to put together. Now, making a gingerbread house--that's a LOT harder than it looks.

Saturday, March 29, 2014

Halo-Halo!


If you haven't heard of "Halo-Halo," you're missing out on an amazing and unique treat that's perfect for the upcoming summer weather. A fun sounding word that literally means "mix-mix" in Tagalog, this milk and ice cream dessert originates from the Philippines but is said to have been introduced by the Japanese 100 years ago when they used the Philippines' local fruits to create new sweets to sell in their businesses. Today, the bright colors and creamy textures of Halo-Halo are still drawing in crowds of Filipinos and Americans alike.

Now, being sadly lactose intolerant myself, I can only have but a small taste of these heavily dairy-laden concoctions when I visit Filipino restaurants (and a few other local Asian restaurants that have similar desserts). But that doesn't mean I can't make this cool parfait for others! In the middle of March, I brought a whole tray of them into my Tagalog language class that I'm taking for fun (I love learning languages).

We were not required to bring Filipino food in to class, though it was strongly encouraged by my classmates. Being the baker and experimenter that I am, how could I not? I've made the Filipino dessert Bibingka in the past, but this time I thought I'd try something a little different. After seeing delicious pictures of Halo-Halo online, and finding most of the ingredients prepackaged in the Filipino market near my house, I decided it would be the perfect treat to bring, if I could just pull it off without everything melting ahead of time.

So I purchased my ingredients, used this handy WikiHow video as a guide to get the construction right, and started to put my Halo-Halo desserts together about 10 minutes before class (luckily I had a nearby fridge and freezer I could borrow to store the ice cream at work).

Ingredients:

Ube ice cream (it's purple yam ice cream, and it's delicious) or an ice cream flavor of choice
Jar of Kapuso Halo-Halo Fruit Mix and Beans (see image below as well)
Ice (small cubes or shaved--I bought my ice from Sonic since they use the small kind)
Lowfat evaporated milk (I used Carnation brand)
Ube or other flavored wafer stick cookies (if you can't find Filipino cookies like Stik-O's, regular Pepperidge Farm Pirouettes will do as well)


Directions:

1.) In a clear glass or plastic cup, drop in the fruit and beans from the Halo-Halo mix.

2.) Add shaved ice, filling the glasses almost to the brim.

3.) Pour evaporated milk over the ice (be careful, it may spill) and top with a scoop of ice cream and a cookie stick.

When you're ready to eat it, just take a spoon and "mix-mix" all the ingredients together. The result is such an amazing (and very sweet) flavor--the perfect way to cool down on a hot day and treat yourself to something delicious that you might not have thought to try.

Halo-Halo might be a little harder for casual blog readers to make if they don't have a Filipino market nearby, but I would have to say the results are worth doing a little shopping outside your comfort zone (many of the ingredients can be found online if you can't find them in stores). Once you have the ingredients, the quick steps make it so easy to impress your Filipino friends or introduce others to a new kind of summertime fix.

Tuesday, February 5, 2013

Mini Chocolate Chip Cookies


Another one for my grandma. After tasting my Classic Snickerdoodles, my grandma once again requested I bring her some home-baked cookies on our next visit, and I'm always eager to fulfill a request. With grandmas, sometimes classic is best (nothing super adventurous), so I stuck with a chocolate chip cookie recipe from the back of a bag of Nestle mini chocolate chips (quick and on hand). As usual, however, my adaptations included whole wheat pastry flour and adjusting the amount of chips to my liking. Another adjustment I would make is to bake these cookies for only about 8 minutes (the original recipe said 9-11 minutes!) since the bottoms did turn out just a little dark. But the flavor is there for sure, as classic as a chocolate chip cookie can get.

(Also, keep in mind that the "mini" in Mini Chocolate Chip Cookies stands for "mini chocolate chips" and not "mini cookies." These things spread wider than you'd expect!)

Ingredients:

1 and 1/8 cups sifted whole wheat pastry flour
1/2 teaspoon baking soda
1/2 teaspoon salt
1 stick of butter, softened
6 Tablespoons brown sugar
6 Tablespoons white sugar
1/2 teaspoon vanilla extract
1 egg
Just under 1 cup of mini chocolate chips

Directions:

1.) Preheat the oven to 375 degrees. In a bowl, combine the flour, baking soda and salt.

2.) In a separate bowl, combine the butter, sugar, vanilla and egg. Add the dry ingredients to the wet ingredients, and beat to thoroughly combine. Then add the chocolate chiops and mix again.

3.) Use a Tablespoon to drop mounds of batter onto an ungreased cookie sheet, leaving some room between the cookies to allow for spreading. Bake about 8 minutes (or 9 if you want them crisper).

4.) Transfer cookies to a wire rack to cool, but enjoy while they're still warm.

Unfortunately, my grandma had to go to the ER before our next visit, so I gave her the cookies in her hospital room. While she wasn't eating much, she made a point to bite into and keep down at least a portion of one cookie, which is not only her own kind of praise for my efforts but a good sign that she can regain her appetite and get more calories in. I hope she heals quickly and is back to her lively, cookie-requesting self soon.

Friday, November 23, 2012

Happy Halloween! (A little late)


Witch Hat Cookies (Oreos and Hershey's Kisses)
Pumpkin Cakes (Whoopie Pie recipe)
Mummy Wrapped Hotdogs
Cheese Wreath
It was my turn to host Game Night with my group of "bookish" library friends, and All Hallow's Eve was approaching fast. Why not make it a Halloween party? Snacks would need to be provided regardless, and I'm not ashamed to say I loved the idea of becoming a hostess in a princess gown. Everything on the menu had to be seasonal, of course. Which meant primarily "fall," "pumpkin" and just a little "creepy cute." With Fright Bites Halloween tortilla chips, Witch Hat Cookies (made just by "pasting" a Hershey's Kiss to the bottom half of an Oreo cookie with a dab of orange frosting) and Mummy Hotdogs (wrap turkey or beef hotdogs with strips of cut Pillsbury Crescent roll dough and bake about 12 minutes at 375 degrees) my "creepy cute" theme was complete. I displayed a wreath of cheese slices cut with leaf-shaped cookie cutters for the "fall" part of the theme as well. And as for pumpkin (my favorite, favorite, favorite), check out the recipes below:

Pumpkin Cakes (I found the recipe for this one on the back of a Whoopie Pie pan given to me for my birthday by one of my awesome coworkers--the perfect gift!  I adjusted the recipe just slightly because I didn't end up making the filling)

Ingredients:

1 and 1/2 cups flour
1 teaspoon cinnamon
1 teaspoon baking soda
1/2 teaspoon baking powder
1/2 teaspoon salt
1/4 teaspoon nutmeg
1/8 teaspoon ground cloves
4 Tablespoons softened butter
1 cup sugar
2 eggs
1/2 cup canned pumpkin
1/2 cup buttermilk

Directions:

1.) Preheat the oven to 350 degrees and spray your pan with nonstick cooking spray. Then in a bowl, combine the flour, cinnamon, baking soda, baking powder, salt, nutmeg and cloves.

2.) In a separate bowl, beat together the butter and sugar with an electric mixer until it's fluffy. Add in the eggs one at a time, beating after each addition.

3.) Fill the pan about 1/2 full, spreading the batter so it fills each cavity. Bake about 7-9 minutes or until a toothpick inserted in the center comes out clean. Let them cool in the pan about five minutes before removing.


Pumpkin Dip (a new recipe compared to the Pumpkin Cream Cheese Dip of last year. I found this one on the Taste of Home website, but adapted it and used store-bought Stacy's Pita Chips: Simple Gingerbread instead of their "black cat dippers." Incidentally, gingerbread pita chips are AWESOME).

Ingredients:

16 ounces cream cheese (I used two 8 ounce packages of a reduced fat cream cheese)
1 can pumpkin (15 ounces)
1 cup sugar
1 Tablespoon pumpkin pie spice
1 Tablespoon maple syrup

Directions:

1.) In a bowl, beat the cream cheese until it's fluffy. Then add in the pumpkin, sugar, spice, and maple syrup.

2). Continue to beat until the mixture is smooth. Refrigerate until ready to serve.

For this dip I ended up doubling the amount of cream cheese and replacing the original Taste of Home recipe's honey with maple syrup to keep in the flavors of fall. I think it worked quite nicely whether you dipped pita chips, apple slices, or simply ate it with a spoon. Which I wouldn't dare do...while anyone was looking....

All in all, I'd have to say Halloween was a success! Though I didn't have time to make my favorite Caramel Apples for the party, I was able to make them the actual night before Halloween for some of my coworkers--thus even those not at Game Night (my parents only allow so many people over to our house at a time) could share in the deliciousness of October treats.

And with October over at last, it was time to start thinking about the hostess duties that come with entertaining for my family at Thanksgiving....


Thursday, November 22, 2012

Oatmeal Banana Pecan Cookies


I can't remember why I made these, other than the fact that I felt like baking in the morning before a jog. Come to think of it, I can't remember how they tasted, or even where I got the recipe/idea from. Not necessarily a good sign in cooking (you want your concoctions to be memorable), but I like the look of them in the photo and the name (you can't go wrong with bananas or pecans in baking, really) that I've decided to share them anyway. Once I track down the recipe....

Oh, thank goodness I save everything! I found a sticky note with the recipe in my big orange recipe binder (yay for being somewhat organized!).


It turns out this cookie also came from the book Crazy About Cookies by Krystina Castella, where my Snickerdoodle recipe was from. Now I remember. I flagged about a hundred recipes (well, at least 35) in the collection of "300 scrumptious recipes for every occasion and craving" and wanted to try baking my way through the book. So far my progress on that has been: two. But now with only one job to worry about and the Christmas cookie season approaching, perhaps I'll be able to get even further in my goal!

But back to bananas and pecans. And oatmeal. Oh I do love a good oatmeal cookie. And it's healthy too. Add some fruit and heart-healthy nuts in there and you really can't call my Oatmeal Banana Pecan Cookies a "guilty pleasure," but rather just a "pleasure." I think. It has been quite a while since I tasted them....

Ingredients:

1 cup flour
3/4 cup rolled oats
1/2 teaspoon cinnamon
1/2 teaspoon baking powder
1/2 teaspoon baking soda
1/4 teaspoon salt
1 stick softened butter
1/2 cup brown sugar
1/2 cup mashed banana
1 egg
1 teaspoon vanilla
1/4 cup dried banana chips (I left this out, having no banana chips)
Optional 3/4 cup pecans (I put this in rather than the other options of chocolate chips or raisins).

Directions:

1.) Preheat the oven to 350 degrees. In a bowl combine the flour, oats, cinnamon, baking powder, baking soda, and salt.

2.) In a separate bowl, beat the butter and sugar together until fluffy (again, you can use an electric mixer for this, or just your arm muscles). Beat in the banana, egg and vanilla as well.

3.) Slowly add the flour mixture into the butter mixture until it is well blended. Stir in the pecans. Then drop about 1 Tablespoon-sized mounds onto a cookie sheet lined with parchment (not wax) paper or greased with non-stick cooking spray.

4.) Bake about 8-12 minutes and let cool slightly before eating!

You'll have to let me know how these turned out. Even if my memory's going already, at least I have a blog of recipes and photos to document everything I make so that one day when my memory's really gone I'll still be able to recreate a few treats and pass them along to those with better memories than me.

Classic Snickerdoodles


This one's for my grandma.

No, my grandma (on my dad's side) never baked for us. I don't have hand-me-down recipes from her or memories of us with flour-dusted faces rolling out dough together in the kitchen. She was born in French Algeria and had to learn English and married my grandpa who was in the Navy, so she's got her own stories instead. But she loves the fact that I love to bake. So on our last visit she commanded me to bring her cookies the next time. I was happy to oblige.

My grandma doesn't really have a favorite type of cookie, but after consulting with my parents we decided something somewhat mild, soft, but still delicious was in order. I'd always wanted to try making Snickerdoodles, so this seemed a perfect opportunity. Following a recipe from the book Crazy About Cookies by Krystina Castella that my awesome coworker Miss Pat gave me, I was able to deliver a beautiful batch of cinnamon-dusted sweets!

Ingredients:

1 and 1/2 cups whole wheat pastry flour
1/2 teaspoon baking soda
1/2 teaspoon cream of tartar
1/4 teaspoon salt
1 stick of butter, softened
3/4 cup light brown sugar
1 egg
1 teaspoon vanilla
1/4 cup granulated sugar
2 Tablespoons cinnamon

Directions:

1.) Preheat the oven to 375 degrees and line a cookie sheet with parchment (not wax) paper. Then in a bowl, combine the flour, baking soda, cream of tartar and salt.

2.) In a separate bowl, beat together the butter and brown sugar until it's fluffy, then beat in the egg and vanilla (usually electric mixers are recommended for this, but I tend to just use a fork and my own muscle as best I can).

3.) Slowly add the flour mix to the butter mix and stir together. Use your hands to shape the dough into small balls, about 2-inches in diameter. Roll them in a mixture of the 1/4 cup granulated sugar and the 2 Tablespoons of cinnamon (I find stirring the two together in a small paper bowl ahead of time works well).

4.) Set the balls of dough on the cookie sheet and flatten just slightly. Bake for 12-14 minutes (that's what the recipe called for, but I did about 8-11 minutes so they wouldn't burn) until lightly browned around the edges. Let cool and top with more cinnamon sugar mix as needed.

These did receive praise from their intended recipient, and a request for more cookies at our next visit!

My brother's girlfriend, my brother, me, my grandma, and my brother.
On this visit I brought Peanut Butter Cookies!


Thursday, May 31, 2012

Coconut Refrigerator Cookies


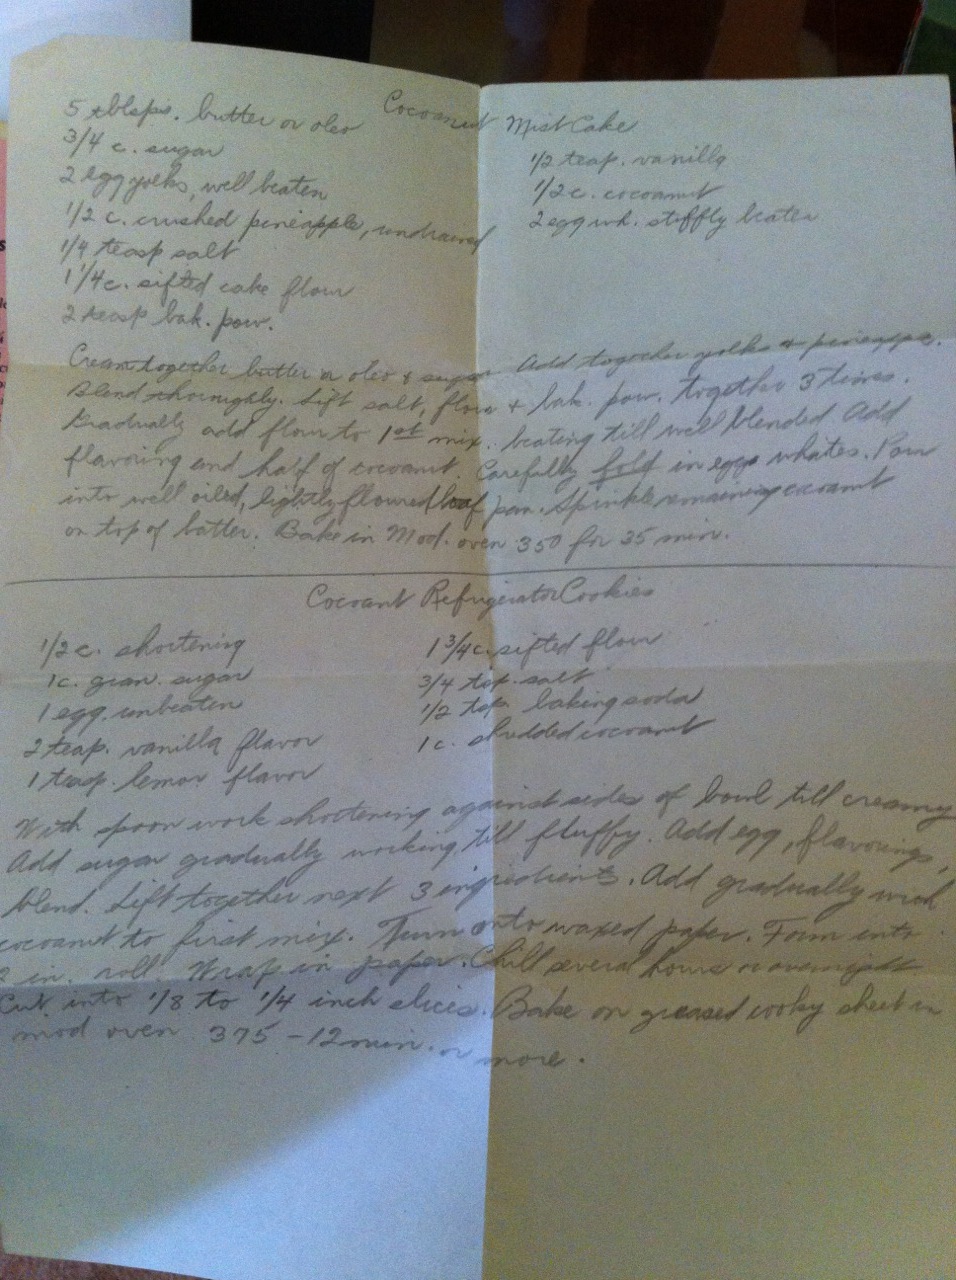
I love old cookbooks. It's not so much the recipes--because they sure did like to use a lot of lard back then--but really more about the style. Classic '50s illustrations. Faded black and white photos. Sometimes even handwritten directions. At least, if you find an old cookbook at a used bookstore, there's a definitely possibility of unearthing a handwritten treasure. Recall my Beacon Hill Brownies post and you might remember that I once discovered a collection of old recipes hidden together in the pages of a worn, antique cookbook before. So I was delighted upon purchasing The Family Circle Cake and Cooky Cookbook to discover that it, too, contained newspaper recipes from the 1970s, unidentifiable magazine cut-outs and a lovely little handwritten paper detailing how to make Coconut Refrigerator Cookies.


I love coconut! And this tropical fruit is perfect for summer! I had to test this one out (here it is word for word from the paper, with my notes in parentheses or bold).

Ingredients:

1/2 c. shortening (I used non-hydrogenated vegetable shortening--NOT lard)
1 c. gran. sugar (granulated)
1 egg, unbeaten
2 teasp. vanilla flavor
1 teasp. lemon flavor (I used lemon extract we had in the cabinet)

1 3/4 c. sifted flour (I went with my staple: whole wheat pastry flour)
3/4 tsp. salt
1/2 tsp. baking soda
1 c. shredded coconut (the brand I used this time was Fancy Flake Coconut (Sweetened) from Albertsons)

Directions:

1.) With spoon, work shortening against sides of bowl till creamy. Add sugar gradually working in till fluffy.

2.) Add egg, flavorings, blend. Sift together next 3 ingredients. Add gradually with coconut to first mix.

3.) Turn onto waxed paper (or plastic wrap). Form into 2 in. roll (basically, a log that's 2 inches high. This can be a bit tricky--if the dough is too dry some of the pieces fall off. You can either add a little more liquid, or just use the "fallen" dough for taste testing). Wrap in paper (again, plastic works well too). Chill several hours or overnight.


4.) Cut into 1/8 to 1/4 inch slices (I used a serrated bread knife but had a little trouble with fallen dough again). Bake on greased cooky sheet (I prefer using parchment paper instead of the greasing) in mod oven 375 -- 12 minutes or more (I cut back to about 8 minutes for most of them since the coconut flakes sticking out started to brown quickly).

I also cooled these cookies on their baking sheet for five minutes before transferring to a wire rack to cool completely. That's it!

I love that this mysterious home cook/recipe writer abbreviates and keeps things simple as much as I do! The use of "till" and "cooky" was adorable, though I did have to analyze her (I'm assuming "her") cursive handwriting (a lost art) for several minutes to decipher "mod oven."  Could that be "med" oven? "Mool" oven? I still wouldn't be quite sure if it wasn't for other recipes in the cookbook calling for a "moderate oven," which I'm assumed meant "not too hot" (Further research determined it to mean between 325 and 375 degrees).

But back to the results--quite pleasing indeed!  The texture of these cookies turned out to be light but with a sturdy crunch. They're sweet, but the overwhelming lemon flavor helps to balance that out (and when rolling the dough into a log, I seriously could not stop eating the fallen pieces). The coconut was a nice touch that gives these cookies just a little something extra.

Best of all, the recipe was so easy! Aside from having to wait a few hours for the dough to chill in the fridge (and now I would also recommend letting it come to room temperature before slicing to hopefully keep the dough more together) this really takes no time at all. Thank you mysterious home cook/housewife/magical recipe collector! Our paths will surely cross again as you've given me an excellent treasure trove to dig into.

Saturday, May 12, 2012

Dirt Cup Pudding


Before the heat of summer rolls around we can still all enjoy the fun activities that spring has to offer! For some people, spring is the time for planting flowers in the dirt. For me, it was making "dirt cups" for kids at the public library to go with our "Spring" story time theme on March 31!

On the agenda for story time was reading There was an Old Lady Who Swallowed Some Bugs by Johnette Downing, When Will It Be Spring? by Catherine Walters, and Diary of a Worm by Doreen Cronin. We also planted our own Morning Glories in a real cup of dirt before ending the program with a much tastier kind of "dirt!" I promise, this pudding is not as "gross" as it looks!

Dirt Cup Pudding

Ingredients:

2 cups cold milk
1 small package (3.4 oz.) chocolate pudding mix (I used JELL-O brand)
8 oz. whipped topping (like Cool Whip), thawed, not frozen
16 oz. crushed Oreo cookies (I crushed them by hand by pouring them into a large zipped-top plastic baggie)
10 gummy worms and 10 clear cups

Directions:

1). Mix the pudding and milk together in a large bowl. Let sit 5 minutes.

2). Stir in the whipped topping and half the crushed cookies.

3). Drop about 1 teaspoon of crushed cookies into each clear cup. Fill 3/4 of the way full with the pudding mixture. Top with the rest of the cookies.

4). Refrigerate at least one hour (if possible). Garnish each cup with a gummy worm and eat up with a spoon!


Special thanks to Cooks.com for helping me find the perfect dirt cup recipe to try and to all the Saturday Drop-In story time kids at the library who were my eager taste testers!

Saturday, March 17, 2012

Single-Portion Sugar Cookies!


Happy St. Patrick's Day! While not necessarily known as a typical dessert holiday (like Thanksgiving, Christmas and Valentine's Day for me), I love any excuse to bake anything--even if it turns out green. Especially if it turns out green (my all-time favorite color!).

While I could have picked Irish Soda Bread or even Green Eggs and Ham to make and post about for this occasion, I'm choosing to write about sugar cookies instead. Why sugar cookies? Because they're the most classic holiday cookie you can eat (Chocolate Chip does not count as a "holiday cookie" to me, but rather an "anytime cookie"). Sugar cookies are the proverbial pot of golden deliciousness at the end of the rainbow. And what makes this recipe even more magical is that you can whip up one of these cookies for yourself in an instant! The recipe is individually portioned--an original creation I used at the public library where I work in our quarterly children's baking program this very afternoon!

If you're a regular reader of my blog, or a regular patron/staff member at my library, you may already be familiar with the "Bake With Me" program I set up every season for kids ages 2-6 to get hands-on baking experience with their parents or caregivers. You may have seen how excited and frazzled I get on a "Bake With Me" day, or how proudly I beamed when the program was mentioned two years ago in the national Association for Library Services to Children (ALSC) e-newsletter (scroll about halfway down the page to find the writeup and two more single-portion recipes!). When you combine baking, kids and libraries, how can the results be anything but awesome? I can't help but want to share them!


So even if you've never seen the program, the beauty of this blog is that I can show the same recipe we used so you can recreate the experience with your kids, parents, friends or just you when you're craving a cookie. You don't even have to make it green if you don't want to. Just make it fun!


Shamrock Sugar Cookies


Ingredients:
1/2 Tablespoon butter, softened
1 Tablespoon sugar
1/2 Tablespoon egg or egg substitute (the substitute makes for easier pouring--anything like Egg Beaters will work)
1/8 teaspoon vanilla extract
3 Tablespoons whole wheat pastry flour (That's what I always use, but any flour will do)
1/16 teaspoon baking soda (I just filled a 1/8 teaspoon half full)
1/16 teaspoon salt (Or a pinch. That works too)
6 drops green food coloring

Directions:

1). Preheat the oven to 350 degrees and place a square of parchment (NOT wax) paper on a baking sheet.

2). Use a fork to mush the butter in a small bowl and combine it with the sugar. Add the egg and vanilla, then mix again and set aside. In a slightly larger bowl, combine the flour, baking soda and salt.

3). Add the sugar mixture to the flour mixture. Drop in the food coloring and mix well. At this point it helps to use your hands to knead the dough a little--the green color spreads more evenly that way. Then flatten the dough with your hands and use a shamrock cookie cutter (or any cookie cutter, really) to press out the shape.

4). Bake on the parchment papered baking sheet for about 6-7 minutes, then let cool slightly before eating.

With a wee bit o' luck, you'll end up with a cookie that's quite a charm! Enough to make even the leprechauns green with envy. Enjoy!


Monday, December 19, 2011

Coconut Cookies!


If you can host Christmas in July, you most assuredly can invite tropical flavors to baked goods in December. Having a few leftover bags of sweetened coconut flakes from my kids' cooking program at the library (posted here--the spooooky Banana Ghosts) I decided to experiment with making a cookie that I could easily bring in to work around the holiday season and also satisfy my own craving for coconut. This is a love that only recently developed within the past few years when I discovered how wonderful coconut and dark chocolate pair in candy boxes (I couldn't stand "that shredded stuff" as a kid). Instead of going with chocolate in my cookies, however, I opted to put a twist on traditional chocolate chip cookie recipes, using the same basic dough, but adding coconut instead of chips. First found here (a recipe by N. Hoff on AllRecipes.com), I again made a couple of changes for my own personal tastes--basically whole wheat pastry flour and a whole teaspoon of vanilla extract. The results? Such compliments as "awesome & oh so yummy!!" and "the best coconut cookies I've ever had!" Much thanks to N. Hoff for the idea and to my coworkers for their kind words! I now plan to repeat Coconut Cookies whenever I can!

Ingredients:

1 and 1/4 cups whole wheat pastry flour
1/2 teaspoon baking soda
1/4 teaspoon salt
1 stick unsalted butter, softened
1/2 cup packed brown sugar
1/2 cup white sugar
1 egg
1 teaspoon vanilla extract
1 and 1/3 cups sweetened coconut flakes

Directions:

1.) Preheat the oven to 350 degrees and spread a piece of parchment (NOT wax) paper on a baking sheet.

2.) Sift the flour, baking soda, and salt into a large bowl and stir together. In a separate bowl, combine the soft butter with both sugars and beat until the mixture is smooth (you can use an electric mixer, but I just used a fork and stirred really hard!). Add the egg and vanilla to the butter mixture and continue to beat until everything is well combined.

3.) Slowly add the flour mixture to the butter mixture until no more flour is visible. Then stir in the coconut.

4.) Form the dough into small Tablespoon-sized balls, slightly flattened, and place on the parchment paper (or if you don't have parchment paper, just an ungreased cookie sheet).

5.) Bake for about 10 minutes until the cookies are golden brown around the edges. Allow them to cool slightly, but you can eat them while they're still warm!

I love cookie season! But lots of chocolate is coming up next!

Tuesday, December 13, 2011

Peanut Butter Chocolate Cookie Bites


Need a tasty cookie in a hurry? Want something both different and familiar? Love the whole, "You got chocolate in my peanut butter" flavor combination? Look no further than these quick and easy Peanut Butter Chocolate Cookie Bites! Adapted from my traditional Peanut Butter Thumbprints recipe, this one's even easier. I just put it together last night in a (successful) experiment to be brought to my coworkers this morning. The peanut butter I used is Sunland brand, bought at Fresh & Easy Neighborhood Market and has the chocolate already inside it! (Sunland also makes a variety of other flavored peanut butters that I love, including Banana. Check out their website home page and you'll be greeted by an entertaining Valencia peanut song as well). Or you could always try with Nutella. But to keep the flavors as simple and clean as possible, I stuck with tradition. ("You got peanut butter in my chocolate!')

Ingredients:

1 cup chocolate peanut butter spread
3/4 cup white sugar
1 egg


Directions:


1.) Preheat the oven to 350 degrees. In a mixing bowl, combine the peanut butter sugar and egg, stirring with a fork until all ingredients are well incorporated.

2.) Use your fingers to keep the dough together and form small 1-inch balls by rolling the dough in the palms of your hands. Set on a baking sheet lined with parchment (NOT wax) paper, and flatten slightly to form small discs (or what I like to call "buttons").

3.) Bake for approximately 8 minutes until the edges of the cookies just begin to harden. Remove from oven and let rest 5 minutes on the baking sheet before transferring the cookies to a wire rack to cool completely.

That's it! You're done! Wasn't that easy? Next time I might try pressing some kind of white chocolate or other candy in the center to make a "thumbprint." Or see how the recipe turns out with that banana peanut butter....

Saturday, November 12, 2011

Tot Chefs!


In the public library where I work as a Youth Services Specialist, we host a quarterly baking program I dubbed "Bake with Me" where children as young as 2 and old as 6 can experience real food creation as they become tot chefs for the morning! It's a cooking class/story experience that encourages motor skills, counting skills, and creativity, while promoting special one-on-one time with parents and caregivers. For the fall season, however, our Halloween "trick" was that none of our "treats" required any baking at all! On Oct. 25, the kids and I created four special Halloween desserts that are cute, easy, and so much fun! If you need ideas for next Halloween, or for funny kids snacks any time of year, check out the simple recipes below:

Apple Fangs (inspired by the Disney Family Fun "Apple Bites" recipe)


Ingredients:

1/4 apple (cut in half twice)
1 Tablespoon peanut butter
2 almond slivers

Directions:

1.) Spoon peanut butter (or a peanut butter substitute if your child is allergic) onto the center of the apple slice.

2.) Press 2 almond slivers onto the peanut butter for fangs.

3.) Bite carefully, if you dare...and enjoy!

Mummy Wands (inspired by the Bright Ideas M&M'S blog "Mummies" recipe)


Ingredients:

1 large pretzel stick
1 Tablespoon vanilla frosting
2 mini chocolate chips

Directions:

1.) Use a spoon to drizzle or smear vanilla frosting onto your pretzel stick in strips like a mummy's wrapping.

2.) Dot the stick with 2 mini chocolate chips for eyes.

3). Time to eat it! Spookily delicious!

Banana Ghosts (Inspired by the Disney Family Fun "Banana Ghosts" recipe)


Ingredients:

½ banana (cut horizontally)
Drizzle of honey
¼ cup coconut flakes
2 mini chocolate chips

Directions:

1.) Cut your banana in half and drizzle with honey to coat.

2.) Roll the banana in coconut flakes until it looks white as a ghost.

3.) Add 2 chocolate chips for the eyes!

Spider Cookies (the most labor intensive, but the most adorable--inspired by many similar recipes, such as the Bright Ideas M&M'S blog "Spider Cupcakes" recipe).


Ingredients:

1 Oreo or other sandwich cookie
1 Tablespoon chocolate frosting
2 Tablespoons chocolate sprinkles
2 candy eyes
4 mini pretzel sticks


Directions:


1.) Dip cookie top in frosting, then sprinkles.

2.) Use dots of frosting to stick candy eyes to the cookie top.

3.) Snap pretzels in half to make 8 legs. Open the cookies and place 4 on each side, sticking them into the cream!

These directions were kept especially short and sweet so that the kids and parents could easily follow them in the limited time period of a single library program. The results were definitely a success!


Nom, nom, nom the mummy!
Spider cookies!
And some kids got a little experimental with their spiders....

Tuesday, August 30, 2011

Mickey Mouse Cookies!


To make up for the last silly experiment post, here is an actual recipe that I baked yesterday for a rescheduled wedding shower dessert potluck at work today. I was excited for the opportunity to use a new cookie cutter I had just bought last week at Disneyland! Naturally, my dessert for the shower had to be: Mickey Mouse Cookies (Not to mention the fact that the bride is a HUGE Disney fan!).

To start, I wanted a basic, simple sugar cookie recipe that's result would hold up well in the face of decorations. So I decided to try a recipe appropriately titled, "Simple Sugar Cookies" by famed Italian chef Lidia Bastianich in the back of her children's picture book, "Nonna Tell Me a Story: Lidia's Christmas Kitchen". The book is darling, and great to read around the holidays, and I was equally excited to be able to taste test one of her many recipes--adapted slightly to my needs:

Ingredients:
3 cups all-purpose flour (I used whole wheat pastry flour, of course)
1 teaspoon baking powder
pinch of salt
2 sticks unsalted butter, at room temperature
1 cup sugar
1 egg
1 teaspoon vanilla extract


Directions:


1.) Preheat the oven to 350 degrees. Sift the flour, baking powder and the salt into a bowl. Using an electric mixer, cream the butter and sugar together in another bowl, then add the egg and vanilla to the butter mixture and continue to beat. Add the flour mix to the butter mix little by little until they are thoroughly combined.

2.) Shape the dough into four equal disc shapes (I made three), wrap in plastic wrap, and refrigerate for an hour or more. Lidia notes that the dough will be "a bit crumbly, but will come together when chilled." However, even though I left my dough in the fridge for an hour and a half, it remained crumbly and fell apart upon unwrapping. Thus I also added about 1/2 teaspoon vegetable shortening to each disc of dough and kneaded it back and forth until the dry dough because moist enough to roll flat.

3.) Roll each disc of dough to about 1/8 of an inch thick and cut out shapes with your favorite cookie cutter. Lift them carefully to place on a baking sheet lined with parchment (not wax) paper. I got about 26 cookies out of the three discs, working the cut dough scraps back into a ball and rolling them flat again.


4.) Bake about 8-9 minutes, or until the edges of the cookies become golden brown. Remove them from the oven and cool on the baking sheet for 5 minutes before transferring them to a wire rack to cool completely.


5.) Decorate with the icing of your choice! I melted a package of dark chocolate pieces in the microwave for about a minute to use on the Mickey Mouse ears, then, in a separate bowl, melted a package of white chocolate chips with half a tablespoon of vegetable shortening in the microwave to use on the mouse faces. (Stir the chocolate well and dip fast before it hardens!). Leftover white chocolate mixed with a couple drops of red food coloring helped me create pink bows for Minnie Mouse as well. I used a toothpick dipped in dark chocolate to create facial features, and an almond sliver with a drop of green icing completed the eyes.

It was a lot of work to do the decorating part, but definitely worth the cuteness factor that resulted! I hope my coworkers enjoyed!


Thursday, July 21, 2011

Quick Gingerbread Cookies!


...a.k.a. Bad Movie Night Christmas in July Gingerbread Men Cookies recipe
(as discussed here).

Ingredients:

1 and 1/2 cups + 2 Tablespoons whole wheat pastry flour
3/8 teaspoon baking soda
6 Tablespoons unsalted butter
1/4 cup brown sugar
<1/2 Tablespoon ginger
<1/2 Tablespoon cinnamon
<1/2 teaspoon ground cloves
1/4 teaspoon salt
1 egg
1/4 cup molasses

Directions:

1.) Preheat the oven to 350 degrees. In a small bowl, sift the whole wheat pastry flour, baking soda, and spices.

2.) In a large bowl, cream the butter, sugar, eggs, and molasses with an electric mixer or a fork beating very fast until the butter has disappeared into the mix and the ingredients are well combined.

3.) Slowly add the flour mixture to the butter mixture in several batches, pouring from the small bowl into the larger bowl, stirring, and pouring more, and stirring again after each addition until the flour mixture has been thoroughly incorporated.

4.) Using your hands, shape the dough into a small mound in the large bowl and place in the freezer for about 13-15 minutes (14 worked well for me). Remove from freezer, place between two sheets of parchment paper, and flatten with a rolling pin to about 1/4- to 1/8-inch thick. Cut into shapes with your favorite cookie cutters.

5.) Place cookies on an ungreased baking sheet and bake for 7-8 minutes or until edges are just crispy. Remove from oven, cool about a minute, and remove to a wire rack to cool completely. Once cooled, can be eaten plain or decorated with icing of your choice.

These cookies have a great ginger, clove, and molasses flavor without being too overwhelmingly sweet. If you miss that kick of sugar in your cookies, definitely go with the icing. Since my brother and his friend aren't lactose intolerant like me, I threw together a quick frosting made from powdered sugar mixed with half-and-half (not measured), stirred until thick enough to spread like frosting. If you prefer to "drizzle," use more half-and-half. To "coat," use more sugar. Wal-Mart decorating gel also works....

Christmas in July


I bet you can't wait! It's only four days away! That's right--it's time for Christmas in July! No, I don't actually celebrate the day that's exactly five months away from my number one favorite holiday, but this year in July my brother asked if I could possibly whip up a batch of gingerbread cookies for him and his friends to celebrate their weekly "Bad Movie Night" showing (this week: The Gingerdead Man. Yeah, I don't want to know either...).

Actually, the request from my 22-year-old brother went more like this:

David: "Cookies?"

Mom: "We don't have anymore cookies."

David: "Cookies?"

Me: "I can make you some cookies."

David: "Cookies?"

Me: "What kind of cookies do you want?"

David: "Gingerbread."

Me: "...Okay."

Thus began a new baking adventure of producing enough cookies to feed three hungry 20-somethings by the time their 70-minute bad movie was finished. If you've ever made gingerbread cookies, you might know that the dough needs time to chill in the fridge--sometimes even overnight--before being returned to room temperature, rolled out, and cut with adorable cookie cutter shapes.

I had my own "go-to" gingerbread man recipe from years ago, but it still called for that same extended chill time, hadn't been tested in a few years, and was...all the way upstairs.

Time to experiment! I knew I wanted molasses, brown sugar, and cloves in my recipe for sure, so I began to search gingerbread recipes online (using my iPhone that was already downstairs) until I came across something close to what I wanted. Using that as a basis, I began to tweak proportions, add a little more of the stuff I liked (omg, cloves smell amazing) and then chilled the dough in the freezer for just under 15 minutes.

It came out cool but not too hard, which allowed me to flatten the dough easily and quickly cut out various men (and women) shapes before baking them in the oven and praying they tasted acceptable to my brother and his friends.
 
I needn't have worried--20-somethings, like teenagers, will eat anything.

However, they did seem to genuinely enjoy how the cookies turned out, finishing about half the batch before deciding they wanted to buy frosting at Wal-Mart and decorate the rest.

I have limited artistic ability, but the above cookies (aside from the single one adorned in white--mine) were adorably dressed by my brother's friends after I went to bed. Mission accomplished.

And to keep this blog short and sweet, my Bad Movie Night Christmas in July Gingerbread Men Cookies recipe will be posted next.