Showing posts with label Filipino. Show all posts

Sunday, July 24, 2016

Biko Rice Cakes!


Another one I made back in February but only just had time to post:

You may have seen some of my previous posts on various Filipino desserts (kutsinta, halo-halo, and bibingka)--they're so delicious. But I'd never attempted to make one of my other favorites that I've had at many a party before: Biko Kalamay

Basically a sweet rice cake, biko is a delightful mixture of coconut, rice, and syrup flavors, held together in a rectangular package.

All the recipes I've found online sounded a little intimidating, but this one for Biko with Latik syrup from Russian Filipino Kitchen was exactly what I needed.

Ingredients:
1 and 1/2 cups uncooked rice
1 and 1/4 cups water (for cooking the rice halfway)
1 and 1/2 cups brown sugar (1/2 cup for the latik syrup, the rest for the biko cake)
4 cups coconut milk (1 cup for the latik syrup, the rest for the biko cake)

Directions:

1.) After rinsing your uncooked rice in a pot (until the water turns clear), drain the sink water, place the pot on the stove, add the 1 and 1/4 cups cooking water, and bring the pot to a boil.

2.) Once the water has boiled, lower the heat to medium low and cook until the water mostly evaporates. Remove from heat and set aside. The rice should only be cooked halfway at this point.


3.) Make the latik syrup by mixing 1 cup coconut milk and 1/2 cup brown sugar in a separate pan. Bring the pan to a boil and then adjust the heat to medium low as well. Cook for 10 minutes, constantly stirring until the syrup thickens (mine didn't get super thick, but it still worked in the end and tasted great!). Remove from heat and set aside.

4.) Finish the biko cake by mixing 3 cups of coconut milk and 1 cup of brown sugar in a separate pot and bringing to a boil. Add the rice to the milk/sugar, and then mix again. Cook on medium heat for about 30 minutes, stirring constantly until thick.

5.) Remove from heat and transfer to a rectangular or square baking dish (glass or aluminum works well). Flatten the mixture and drizzle with the syrup as a topping. Cool to room temperature (the longer the better) before you cut the cake into squares and serve. Top with toasted coconut.


My first attempt at toasting coconut flakes was not the best (see below), so I'll leave you to find your own recipe for that one!


You'll fall in love with this unique treat--though my version is still not nearly as good as authentic biko made by Filipino chefs!

Wednesday, May 7, 2014

Kutsinta


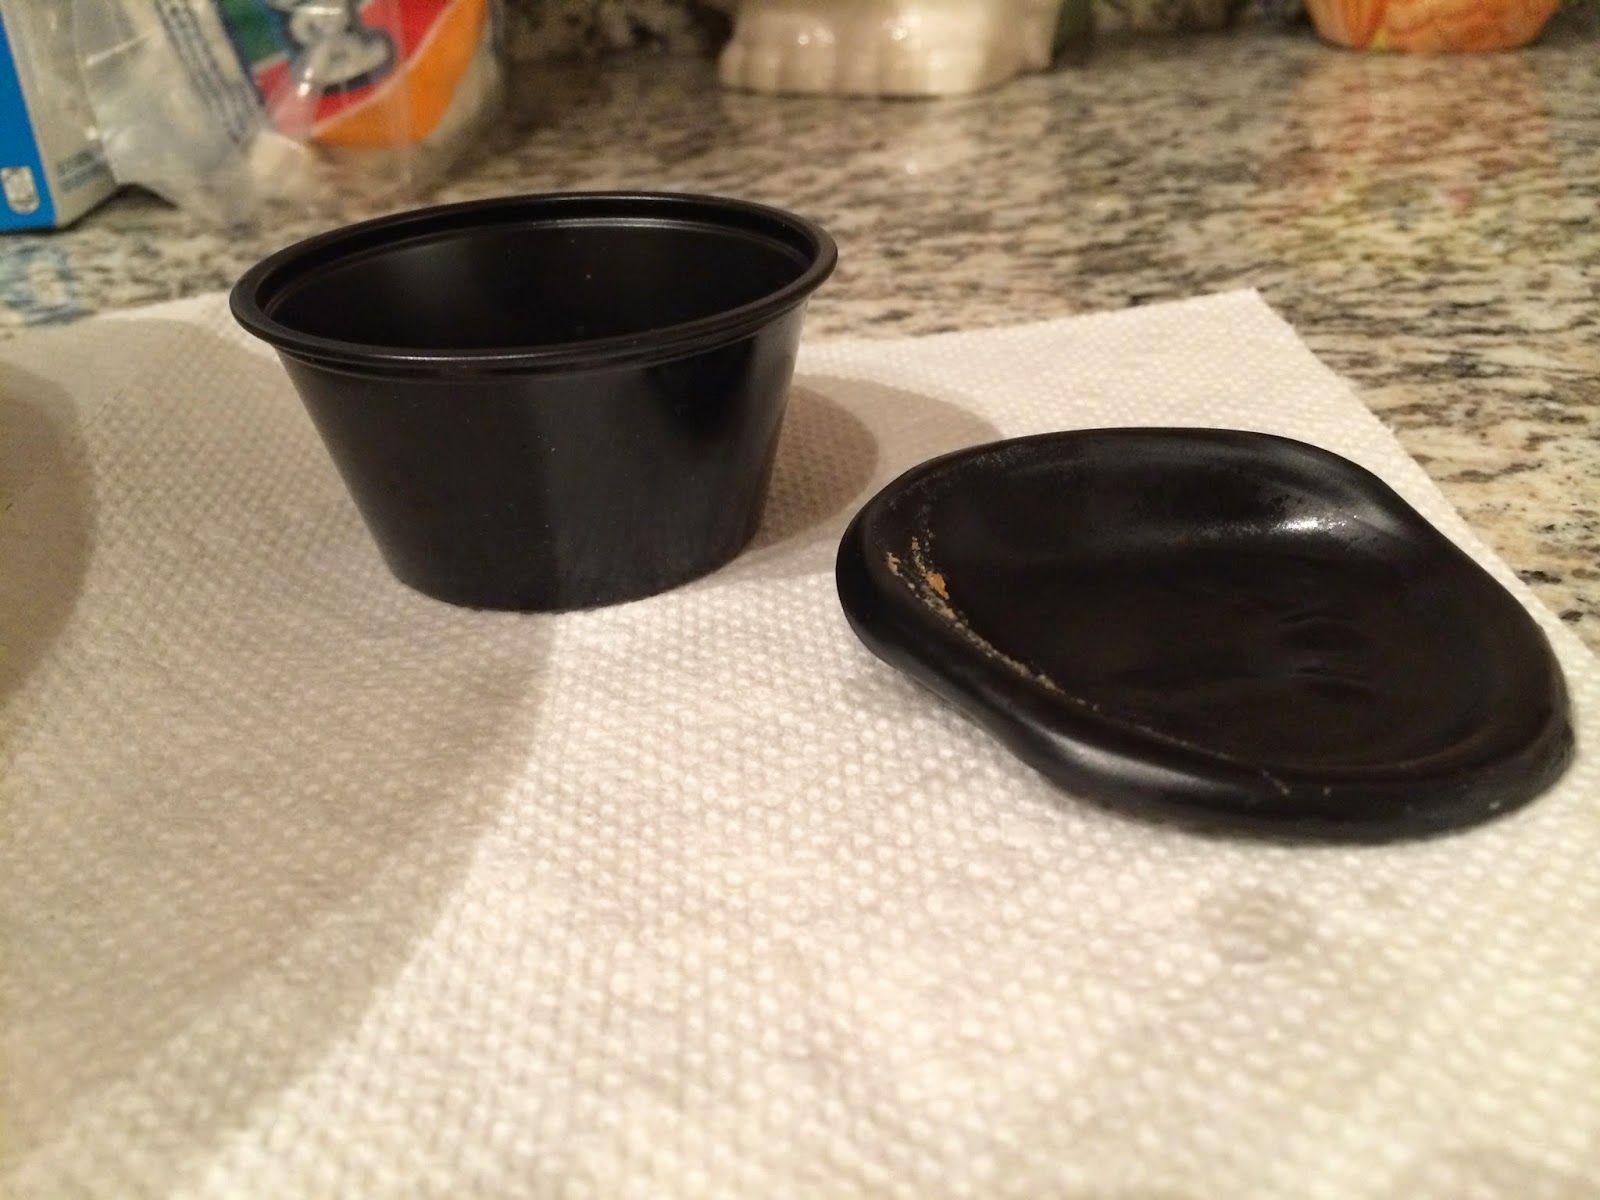
Not all experiments succeed. In fact, some fail into melty, odd-shaped blobs. However, since this is a baking blog and I had my first experiment baking with steam and making a new multicultural recipe, I felt it was important to document the occasion.

Since this week is my last Tagalog class of the semester, we decided to all bring in Filipino food (not unlike our previous classes throughout the semester where we decided to all bring in Filipino food...). For something a little different (besides Halo-Halo and bibingka that I made in the past) I decided to attempt Kutsinta, a sweet brown rice cake with a chewy texture, the look of gelatin, and made using a steaming cooking technique. It's also one of my (many) favorite Filipino desserts. To make it from scratch you need lye water, which I do not have. But I did have a box of "Sarap Pinoy" (roughly translated as "delicious Filipino") Kutsinta ready mix! (sold at the local Filipino market around the corner from my house).


All I really had to do was follow the directions on the box. Heat some tap water in the bottom of a double boiler. Empty the kutsinta mix in a bowl with 1 cup of bottled water and stir. Pour the resulting mix into kutsinta molds and steam in the top part of the boiler for 35-45 minutes or until the concoction turns "clear" (or rather, Jell-O-like).

Here were the problems:

1.) I had no kutsinta molds. They were sold out at the market. So I used the only small cups I had--plastic condiment containers. Word to the wise: plastic melts.


2.) I had no idea how high to keep the heat on, and basically ended up boiling off all my water in the second batch. It evaporated while the heat was still on and ended up burning the bottom of my pot while I was waiting for the second batch to finish cooking (sorry, no picture--I was too devastated).

3.) My kutsinta didn't seem to be turning "clear."  Not after 35 minutes. Not after 45 minutes.


I finally took them off the stove to cool, and only then did they seem to get close to the right color. I flipped them over and...


Huzzah! They may be a bit melty, odd-shaped and stamped with what appears to be some kind of product serial number from the condiment containers, but they do resemble kutsinta (as you can see here).

The plastic did not melt into the dessert since I coated the containers with nonstick cooking spray to make sure they slid out easily. So I think the kutsinta is still fit for consumption. Probably. If not, too late--I already ate one for breakfast....

Just top with coconut and enjoy!

Saturday, March 29, 2014

Halo-Halo!


If you haven't heard of "Halo-Halo," you're missing out on an amazing and unique treat that's perfect for the upcoming summer weather. A fun sounding word that literally means "mix-mix" in Tagalog, this milk and ice cream dessert originates from the Philippines but is said to have been introduced by the Japanese 100 years ago when they used the Philippines' local fruits to create new sweets to sell in their businesses. Today, the bright colors and creamy textures of Halo-Halo are still drawing in crowds of Filipinos and Americans alike.

Now, being sadly lactose intolerant myself, I can only have but a small taste of these heavily dairy-laden concoctions when I visit Filipino restaurants (and a few other local Asian restaurants that have similar desserts). But that doesn't mean I can't make this cool parfait for others! In the middle of March, I brought a whole tray of them into my Tagalog language class that I'm taking for fun (I love learning languages).

We were not required to bring Filipino food in to class, though it was strongly encouraged by my classmates. Being the baker and experimenter that I am, how could I not? I've made the Filipino dessert Bibingka in the past, but this time I thought I'd try something a little different. After seeing delicious pictures of Halo-Halo online, and finding most of the ingredients prepackaged in the Filipino market near my house, I decided it would be the perfect treat to bring, if I could just pull it off without everything melting ahead of time.

So I purchased my ingredients, used this handy WikiHow video as a guide to get the construction right, and started to put my Halo-Halo desserts together about 10 minutes before class (luckily I had a nearby fridge and freezer I could borrow to store the ice cream at work).

Ingredients:

Ube ice cream (it's purple yam ice cream, and it's delicious) or an ice cream flavor of choice
Jar of Kapuso Halo-Halo Fruit Mix and Beans (see image below as well)
Ice (small cubes or shaved--I bought my ice from Sonic since they use the small kind)
Lowfat evaporated milk (I used Carnation brand)
Ube or other flavored wafer stick cookies (if you can't find Filipino cookies like Stik-O's, regular Pepperidge Farm Pirouettes will do as well)


Directions:

1.) In a clear glass or plastic cup, drop in the fruit and beans from the Halo-Halo mix.

2.) Add shaved ice, filling the glasses almost to the brim.

3.) Pour evaporated milk over the ice (be careful, it may spill) and top with a scoop of ice cream and a cookie stick.

When you're ready to eat it, just take a spoon and "mix-mix" all the ingredients together. The result is such an amazing (and very sweet) flavor--the perfect way to cool down on a hot day and treat yourself to something delicious that you might not have thought to try.

Halo-Halo might be a little harder for casual blog readers to make if they don't have a Filipino market nearby, but I would have to say the results are worth doing a little shopping outside your comfort zone (many of the ingredients can be found online if you can't find them in stores). Once you have the ingredients, the quick steps make it so easy to impress your Filipino friends or introduce others to a new kind of summertime fix.

Friday, November 23, 2012

Bibingka


As much as I claim to be a baking "experimenter," I don't always necessarily bake outside my comfort zone. You can tell from my previous blog posts that I love to make pies, muffins, cookies...pies, muffins and cookies...and, okay, the occasional something new--donuts, truffles and baklava were all new to me, for example. And out of all three of those, my baklava was probably the most successful. A good sign--that means I can (sometimes) bake international food. The treat that originated with the Assyrians and is now served at many a Greek restaurant, is one of my favorite dessert indulgences. I've learned that it's truly worth it to try something new.

But this post isn't about baklava.

Rather, one of my friends from the Philippines invited me over for lunch and confessed that while she loved to cook, she hated to bake. "Perfect," I thought. "I can do something about this." While I knew I wasn't the best cook, I could most definitely bake something for her in thanks for the delicious meal.

And so, after some searching, I stumbled across a recipe for a dessert called "bibingka" using one of my library's new databases called A to Z the World (I can't link to the exact page since it's a paid for subscription only accessible to employees and students of the college). The article said Bibingka is traditionally baked in a clay oven (which I don't have) and is a kind of pudding or cake (which sounded delicious). The recipe called for coconut milk (non dairy!) and rice flour (which my mom just happened to recently buy for a different recipe). It sounded easy enough, and I could only hope it was authentic--I wanted the dessert to be a surprise, so I wasn't about to ask.

"Okay," I thought. "Let's do it."

Ingredients:

1 cup sugar
4 Tablespoons melted butter
3 eggs
1 cup reduced fat coconut milk (I found it canned)
1 teaspoon vanilla extract
1 and 1/2 cups brown rice flour (this is what my mom bought, available at whole food stores--the original recipe just called for regular rice flour)
1 Tablespoon baking powder
Grated coconut for topping

Directions:


1.) Preheat the oven to 350 degrees. In a bowl, combine the sugar and melted butter. Add the eggs and stir. Add the milk and vanilla and stir again.

2.) Fold in the flour and baking powder. Mix just to combine.

3.) Pour the batter into a 9x9-inch brownie pan greased with nonstick cooking spray (the original recipe was doubled and called for a 9x13-inch buttered pan, but I didn't have that handy). Bake about 30 minutes (for the full version) until the cake is set (I baked it for about 22-25 minutes until the cake was just slightly browned on the top and set around the edges. A toothpick inserted in the center came out clean).

4.) Allow the cake to cool before removing it from the pan. Top with grated coconut and serve warm.

The results even got my mom addicted, and she can be a little hesitant to eat food outside her own comfort zone. So regardless whether or not the treat was perfectly authentic, I can attest to the fact that it was perfectly tasty! When I brought it over to my friend she was so pleased! And her own mom snagged the first bite before she even had time to try it. I call that high praise indeed.