Wednesday, December 5, 2012

Herb and Cheese Scones


In my attempt to keep on top of my blogging, I must post about my latest successful baking experiment that took place just this morning!  It's my day to bring treats in to the office and it also happens to fall on the birthday of one of my coworkers. My not-so-subtle attempt to determine an appropriate birthday baked good resulted in the suggestion of one of his favorite treats: savory British scones. Lovely! Except, I've never made scones.

After a few forays into my go-to Food Network and Allrecpies.com resources, I ended up just doing a basic Google search that led me to a little blog called Domenica's Dish, where California food blogger Domenica had posted a recipe for Savory Herb & Cheese Scones. It sounded easy enough and didn't involve converting from British methods of measurement. With a few slight adaptations, I ended up with my own version of Herb and Cheese Scones.

Ingredients:

2 cups whole wheat pastry flour
2 Tablespoons white sugar
1 Tablespoon baking powder
1/4 teaspoon salt
1/3 cup cold butter, cut into small pieces
1/4 cup shredded cheddar cheese
1 Tablespoon Italian seasoning
1/2 Tablespoon thyme
1/2 Tablespoon rosemary
1 cup buttermilk

Directions:

1.) Preheat the oven to 400 degrees. In a large bowl, combine the flour, sugar, baking powder, salt and butter. Mix the ingredients well with a fork and then use your hands to start to work it together (you can also use a pastry cutter to cut the butter in).

2.) Add the cheese and all seasonings. Mix again, then add the buttermilk. Stir with a fork until the buttermilk disappears within the dry ingredients, then use your hands to help the dough thoroughly combine and become moist. Add a splash more buttermilk if the dough is still too dry.

3.) Use your hands to mold the dough into golf ball-sized rounds and pat them slightly flat. Place these on a cookie sheet lined with parchment (not wax) paper, about two inches apart from each other. Bake approximately 9-10 minutes.

These taste best warm, but even once they've cooled to room temperature they turned out quite delicious! You can also reheat them in the microwave for a few seconds to recapture that fresh-baked taste!

I'd call it a success when my coworker picked up his third (or was it fourth?) scone of the day a few minutes ago. The treats disappeared faster than usual, and my office break room smelled kind of like gourmet pizza (from the cheese and spices) all afternoon. This recipe's definitely a keeper! I'll have to make scones again!


Friday, November 23, 2012

Mini Pecan Pies!


Finally, I'm caught up to the proper month! These Mini Pecan Pies were actually made by me in November  of 2012, the same month as this blog post! They were created as one final (and seasonal) treat for my coworkers at the public library to bring to the wonderfully sweet goodbye party they threw for me. The recipe basically comes from my Bourbon Pecan Pie recipe that I wrote about last year (which, incidentally, I also made this year for Thanksgiving just yesterday). Except I cut back on the bourbon (one Tablespoon instead of two so it wouldn't taste overwhelmingly alcoholic for those coworkers underage) and I used refrigerated pie dough cut into small circles about three inches in diameter to line a muffin tin sprayed with nonstick cooking spray. I also cut the baking time back to 12 minutes instead of 22. That seemed to do the trick and cause these treats to come out firm but not burnt.

So there's no real recipe needed to type here (check out my Holiday Feast post from last year for further details) and just spend your holiday weekend relaxing. Thanksgiving baking is over. You still have a few days before you have to start worrying about...Christmas cookies....  =)


Bibingka


As much as I claim to be a baking "experimenter," I don't always necessarily bake outside my comfort zone. You can tell from my previous blog posts that I love to make pies, muffins, cookies...pies, muffins and cookies...and, okay, the occasional something new--donuts, truffles and baklava were all new to me, for example. And out of all three of those, my baklava was probably the most successful. A good sign--that means I can (sometimes) bake international food. The treat that originated with the Assyrians and is now served at many a Greek restaurant, is one of my favorite dessert indulgences. I've learned that it's truly worth it to try something new.

But this post isn't about baklava.

Rather, one of my friends from the Philippines invited me over for lunch and confessed that while she loved to cook, she hated to bake. "Perfect," I thought. "I can do something about this." While I knew I wasn't the best cook, I could most definitely bake something for her in thanks for the delicious meal.

And so, after some searching, I stumbled across a recipe for a dessert called "bibingka" using one of my library's new databases called A to Z the World (I can't link to the exact page since it's a paid for subscription only accessible to employees and students of the college). The article said Bibingka is traditionally baked in a clay oven (which I don't have) and is a kind of pudding or cake (which sounded delicious). The recipe called for coconut milk (non dairy!) and rice flour (which my mom just happened to recently buy for a different recipe). It sounded easy enough, and I could only hope it was authentic--I wanted the dessert to be a surprise, so I wasn't about to ask.

"Okay," I thought. "Let's do it."

Ingredients:

1 cup sugar
4 Tablespoons melted butter
3 eggs
1 cup reduced fat coconut milk (I found it canned)
1 teaspoon vanilla extract
1 and 1/2 cups brown rice flour (this is what my mom bought, available at whole food stores--the original recipe just called for regular rice flour)
1 Tablespoon baking powder
Grated coconut for topping

Directions:


1.) Preheat the oven to 350 degrees. In a bowl, combine the sugar and melted butter. Add the eggs and stir. Add the milk and vanilla and stir again.

2.) Fold in the flour and baking powder. Mix just to combine.

3.) Pour the batter into a 9x9-inch brownie pan greased with nonstick cooking spray (the original recipe was doubled and called for a 9x13-inch buttered pan, but I didn't have that handy). Bake about 30 minutes (for the full version) until the cake is set (I baked it for about 22-25 minutes until the cake was just slightly browned on the top and set around the edges. A toothpick inserted in the center came out clean).

4.) Allow the cake to cool before removing it from the pan. Top with grated coconut and serve warm.

The results even got my mom addicted, and she can be a little hesitant to eat food outside her own comfort zone. So regardless whether or not the treat was perfectly authentic, I can attest to the fact that it was perfectly tasty! When I brought it over to my friend she was so pleased! And her own mom snagged the first bite before she even had time to try it. I call that high praise indeed.

Happy Halloween! (A little late)


Witch Hat Cookies (Oreos and Hershey's Kisses)
Pumpkin Cakes (Whoopie Pie recipe)
Mummy Wrapped Hotdogs
Cheese Wreath
It was my turn to host Game Night with my group of "bookish" library friends, and All Hallow's Eve was approaching fast. Why not make it a Halloween party? Snacks would need to be provided regardless, and I'm not ashamed to say I loved the idea of becoming a hostess in a princess gown. Everything on the menu had to be seasonal, of course. Which meant primarily "fall," "pumpkin" and just a little "creepy cute." With Fright Bites Halloween tortilla chips, Witch Hat Cookies (made just by "pasting" a Hershey's Kiss to the bottom half of an Oreo cookie with a dab of orange frosting) and Mummy Hotdogs (wrap turkey or beef hotdogs with strips of cut Pillsbury Crescent roll dough and bake about 12 minutes at 375 degrees) my "creepy cute" theme was complete. I displayed a wreath of cheese slices cut with leaf-shaped cookie cutters for the "fall" part of the theme as well. And as for pumpkin (my favorite, favorite, favorite), check out the recipes below:

Pumpkin Cakes (I found the recipe for this one on the back of a Whoopie Pie pan given to me for my birthday by one of my awesome coworkers--the perfect gift!  I adjusted the recipe just slightly because I didn't end up making the filling)

Ingredients:

1 and 1/2 cups flour
1 teaspoon cinnamon
1 teaspoon baking soda
1/2 teaspoon baking powder
1/2 teaspoon salt
1/4 teaspoon nutmeg
1/8 teaspoon ground cloves
4 Tablespoons softened butter
1 cup sugar
2 eggs
1/2 cup canned pumpkin
1/2 cup buttermilk

Directions:

1.) Preheat the oven to 350 degrees and spray your pan with nonstick cooking spray. Then in a bowl, combine the flour, cinnamon, baking soda, baking powder, salt, nutmeg and cloves.

2.) In a separate bowl, beat together the butter and sugar with an electric mixer until it's fluffy. Add in the eggs one at a time, beating after each addition.

3.) Fill the pan about 1/2 full, spreading the batter so it fills each cavity. Bake about 7-9 minutes or until a toothpick inserted in the center comes out clean. Let them cool in the pan about five minutes before removing.


Pumpkin Dip (a new recipe compared to the Pumpkin Cream Cheese Dip of last year. I found this one on the Taste of Home website, but adapted it and used store-bought Stacy's Pita Chips: Simple Gingerbread instead of their "black cat dippers." Incidentally, gingerbread pita chips are AWESOME).

Ingredients:

16 ounces cream cheese (I used two 8 ounce packages of a reduced fat cream cheese)
1 can pumpkin (15 ounces)
1 cup sugar
1 Tablespoon pumpkin pie spice
1 Tablespoon maple syrup

Directions:

1.) In a bowl, beat the cream cheese until it's fluffy. Then add in the pumpkin, sugar, spice, and maple syrup.

2). Continue to beat until the mixture is smooth. Refrigerate until ready to serve.

For this dip I ended up doubling the amount of cream cheese and replacing the original Taste of Home recipe's honey with maple syrup to keep in the flavors of fall. I think it worked quite nicely whether you dipped pita chips, apple slices, or simply ate it with a spoon. Which I wouldn't dare do...while anyone was looking....

All in all, I'd have to say Halloween was a success! Though I didn't have time to make my favorite Caramel Apples for the party, I was able to make them the actual night before Halloween for some of my coworkers--thus even those not at Game Night (my parents only allow so many people over to our house at a time) could share in the deliciousness of October treats.

And with October over at last, it was time to start thinking about the hostess duties that come with entertaining for my family at Thanksgiving....


Thursday, November 22, 2012

Single-Portion Pocket Pies!


Getting closer to the season we're actually in, I can now share a fall treat that's all about apples. Okay, I lied. While apples are seasonal, and are the filling for this treat, it's really all about the pie. For another library children's program...my last Bake with Me program at the public library :'(


 ...we made Single-Portion Pocket Pies that are such a cinch to make almost any age can do it. If you need a quick fall treat, they come highly recommended by my coworkers as well as the kids in my story time. I dubbed them "Pockets of Fall" and gave each child (well, parent) a recipe card with these simple instructions:

Ingredients:

Refrigerated pie crust dough
1 teaspoon canned apple pie filling (or pumpkin butter, jam, filling of your choice, etc.)
1/8 cup whipped topping
1/4 teaspoon maple syrup

Directions:


1.) Preheat the oven to 425 degrees. Roll the refrigerated pie crusts flat, then use a glass turned upside-down to trace & cut a circle out.


2.) Spread 1 teaspoon filling on one side of the circle, leaving a little space at the edge. Fold the circle in half and seal shut with a fork. Then use the fork to poke holes in the top of the pie.

3.) Place pie on a baking sheet lined with parchment (NOT wax) paper and bake about 13-15 minutes. While the pie cools, stir the whipped topping and syrup together. Use this as a dip or spoon it on top of the pie before eating. Enjoy!

You can also use this same basic concept to make Mini Apple Pies with pie crust dough cut to fit mini pie tins. The lattice design takes a little more time--I used a pastry cutter to cut strips of dough and then just layered them wherever they looked good--but the presentation is worth it. My coworkers at the academic library where I work were impressed!


Oatmeal Cranberry Breakfast Muffins


Whoops, looks like I went a little out of order here. I forgot I made these Oatmeal Cranberry Breakfast Muffins back some time in June (Another sign that my memory's going)? I also don't really remember how they tasted, but they are a healthier treat, with a recipe taken right off a bag of flour. This one I believe I followed almost to the letter, but if you can't read the directions in the photo, I'll still type it out below if you'd like to try recreating a healthy morning snack!


Ingredients:

2/3 cup whole milk (I'm pretty sure I used fat free)
1/4 cup vegetable oil (Canola)
1/4 cup molasses (I love me some molasses)
1/4 cup brown sugar
1 egg
1 cup white whole wheat flour
1 cup quick cooking oats
1 Tablespoon baking powder
3/4 teaspoon cinnamon
1/8 teaspoon nutmeg (my mom loves nutmeg)
1/4 teaspoon salt
1/2 cup dried cranberries (I usually go with Ocean Spray Craisins, since they're easiest to find)

Directions:

1.) Preheat the oven to 400 degrees or 375 degrees if using a convection oven. Then in a bowl, combine the milk, oil, molasses, sugar and egg.

2.) In a separate bowl, combine the flour, oats, baking powder, cinnamon, nutmeg, salt and dried cranberries. Stir in the milk mixture until everything is just combined. (According to the bag, it's supposed to be lumpy, so don't worry).

3.) Line a muffin tin with paper liners and fill each about 1/2 full (should be enough for at least 12 muffins). Bake about 15 minutes (12 minutes for a convection oven) and let cool slightly before removing from the tin.

With the nutmeg and the cranberries, this would probably make a perfect fall treat, so I'm almost caught up to the season!


Oatmeal Banana Pecan Cookies


I can't remember why I made these, other than the fact that I felt like baking in the morning before a jog. Come to think of it, I can't remember how they tasted, or even where I got the recipe/idea from. Not necessarily a good sign in cooking (you want your concoctions to be memorable), but I like the look of them in the photo and the name (you can't go wrong with bananas or pecans in baking, really) that I've decided to share them anyway. Once I track down the recipe....

Oh, thank goodness I save everything! I found a sticky note with the recipe in my big orange recipe binder (yay for being somewhat organized!).


It turns out this cookie also came from the book Crazy About Cookies by Krystina Castella, where my Snickerdoodle recipe was from. Now I remember. I flagged about a hundred recipes (well, at least 35) in the collection of "300 scrumptious recipes for every occasion and craving" and wanted to try baking my way through the book. So far my progress on that has been: two. But now with only one job to worry about and the Christmas cookie season approaching, perhaps I'll be able to get even further in my goal!

But back to bananas and pecans. And oatmeal. Oh I do love a good oatmeal cookie. And it's healthy too. Add some fruit and heart-healthy nuts in there and you really can't call my Oatmeal Banana Pecan Cookies a "guilty pleasure," but rather just a "pleasure." I think. It has been quite a while since I tasted them....

Ingredients:

1 cup flour
3/4 cup rolled oats
1/2 teaspoon cinnamon
1/2 teaspoon baking powder
1/2 teaspoon baking soda
1/4 teaspoon salt
1 stick softened butter
1/2 cup brown sugar
1/2 cup mashed banana
1 egg
1 teaspoon vanilla
1/4 cup dried banana chips (I left this out, having no banana chips)
Optional 3/4 cup pecans (I put this in rather than the other options of chocolate chips or raisins).

Directions:

1.) Preheat the oven to 350 degrees. In a bowl combine the flour, oats, cinnamon, baking powder, baking soda, and salt.

2.) In a separate bowl, beat the butter and sugar together until fluffy (again, you can use an electric mixer for this, or just your arm muscles). Beat in the banana, egg and vanilla as well.

3.) Slowly add the flour mixture into the butter mixture until it is well blended. Stir in the pecans. Then drop about 1 Tablespoon-sized mounds onto a cookie sheet lined with parchment (not wax) paper or greased with non-stick cooking spray.

4.) Bake about 8-12 minutes and let cool slightly before eating!

You'll have to let me know how these turned out. Even if my memory's going already, at least I have a blog of recipes and photos to document everything I make so that one day when my memory's really gone I'll still be able to recreate a few treats and pass them along to those with better memories than me.

Classic Snickerdoodles


This one's for my grandma.

No, my grandma (on my dad's side) never baked for us. I don't have hand-me-down recipes from her or memories of us with flour-dusted faces rolling out dough together in the kitchen. She was born in French Algeria and had to learn English and married my grandpa who was in the Navy, so she's got her own stories instead. But she loves the fact that I love to bake. So on our last visit she commanded me to bring her cookies the next time. I was happy to oblige.

My grandma doesn't really have a favorite type of cookie, but after consulting with my parents we decided something somewhat mild, soft, but still delicious was in order. I'd always wanted to try making Snickerdoodles, so this seemed a perfect opportunity. Following a recipe from the book Crazy About Cookies by Krystina Castella that my awesome coworker Miss Pat gave me, I was able to deliver a beautiful batch of cinnamon-dusted sweets!

Ingredients:

1 and 1/2 cups whole wheat pastry flour
1/2 teaspoon baking soda
1/2 teaspoon cream of tartar
1/4 teaspoon salt
1 stick of butter, softened
3/4 cup light brown sugar
1 egg
1 teaspoon vanilla
1/4 cup granulated sugar
2 Tablespoons cinnamon

Directions:

1.) Preheat the oven to 375 degrees and line a cookie sheet with parchment (not wax) paper. Then in a bowl, combine the flour, baking soda, cream of tartar and salt.

2.) In a separate bowl, beat together the butter and brown sugar until it's fluffy, then beat in the egg and vanilla (usually electric mixers are recommended for this, but I tend to just use a fork and my own muscle as best I can).

3.) Slowly add the flour mix to the butter mix and stir together. Use your hands to shape the dough into small balls, about 2-inches in diameter. Roll them in a mixture of the 1/4 cup granulated sugar and the 2 Tablespoons of cinnamon (I find stirring the two together in a small paper bowl ahead of time works well).

4.) Set the balls of dough on the cookie sheet and flatten just slightly. Bake for 12-14 minutes (that's what the recipe called for, but I did about 8-11 minutes so they wouldn't burn) until lightly browned around the edges. Let cool and top with more cinnamon sugar mix as needed.

These did receive praise from their intended recipient, and a request for more cookies at our next visit!

My brother's girlfriend, my brother, me, my grandma, and my brother.
On this visit I brought Peanut Butter Cookies!


Single-Portion Brownies!


It's Thanksgiving again--usually the time of year to put up my favorite fall recipes and showcase all the delicious feast items I've made for the big Turkey Day. But today, instead, I'm playing catch up. After six months without a single new blog post, I think it's time to finish all my "half-baked" blog post drafts so I can be ready for the holiday season of 2012 and all the delicious baking that entails.

There is a reason, of course, that I've been so behind. Since January I've been working two jobs--one as a full-time academic librarian and one as my usual part-time Youth Services Specialist at the public library. If you've read this blog before (or know me personally), you probably already remember this fact and have even seen a few single-portion recipes (cookies, Halloween treats, baklava, etc.) that emerged from public library children's programs I put together as well. This month, however, I decided it was sadly time to say goodbye to the public library (one can only work two jobs for so long before burning out), but not to my love of Youth Services, children's programs, or sharing yummy treats and recipes with my coworkers and friends.

Having just the one job now should allow me more time for blogging (I hope!), and more time to pay tribute to the awesome times I have had working with kids at the public library--such as with this Single-Portion Brownie that I made with the age 2-6 crowd back in...wow, it must have been June. I'm really behind here...

Ah, but I do remember (vaguely--thank goodness I took notes)...it took three tries to get it perfect. My first attempt at making this treat came out with the perfect color, but was too gooey and tasted just a little bit like alcohol from an overwhelming proportion of vanilla (not good for preschoolers!). Attempt number two was a bit more cakey, lighter in color and not quite sweet enough, though I liked that none of the flavors overwhelmed. I could have ultimately used that recipe in my children's program, but I thought I'd try one more time just in case. I cut back just a touch on the flour and chocolate chips. Suddenly the proportions were perfect. The flavor was awesome. I had to force myself not to finish every sample I created so that I could pass them out to my awesome teen volunteers and coworkers. The results of my efforts are below:


Ingredients:

2 Tablespoons flour
1 Tablespoon cocoa powder
1/16 teaspoon baking powder
Pinch of salt
2 Tablespoons white sugar
Drop of vanilla
1 Tablespoon vegetable oil
1 Tablespoon egg or egg substitute
1 Tablespoon mini chocolate chips

Directions:

1.) Preheat the oven to 350 degrees. In a bowl, combine the flour, cocoa powder, baking powder and salt. In a separate bowl or cut, combine the sugar, vanilla, oil and egg.

2.) Add the flour mixture to the oil mixture and stir until well blended. Stir in the chocolate chips.

3.) Pour the batter into an individual tin or cupcake liner and bake for about 9 minutes. Let cool briefly and enjoy!

Yes, it really is that easy to have your own individual brownie in a matter of minutes. You don't even have to share (That's what "single-portion" means!).

And now, to keep it short and sweet, I won't draw out the conclusion of this post, letting my heart dwell on how much I'll miss doing these programs in the library--because I'm sure I'll get the chance to do them again one day. Instead, it's on to the next post! If this recipe was from June, then there is much to blog before I catch up to November!


Thursday, May 31, 2012

Coconut Refrigerator Cookies


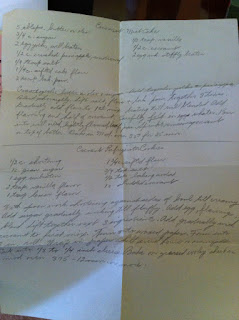
I love old cookbooks. It's not so much the recipes--because they sure did like to use a lot of lard back then--but really more about the style. Classic '50s illustrations. Faded black and white photos. Sometimes even handwritten directions. At least, if you find an old cookbook at a used bookstore, there's a definitely possibility of unearthing a handwritten treasure. Recall my Beacon Hill Brownies post and you might remember that I once discovered a collection of old recipes hidden together in the pages of a worn, antique cookbook before. So I was delighted upon purchasing The Family Circle Cake and Cooky Cookbook to discover that it, too, contained newspaper recipes from the 1970s, unidentifiable magazine cut-outs and a lovely little handwritten paper detailing how to make Coconut Refrigerator Cookies.


I love coconut! And this tropical fruit is perfect for summer! I had to test this one out (here it is word for word from the paper, with my notes in parentheses or bold).

Ingredients:

1/2 c. shortening (I used non-hydrogenated vegetable shortening--NOT lard)
1 c. gran. sugar (granulated)
1 egg, unbeaten
2 teasp. vanilla flavor
1 teasp. lemon flavor (I used lemon extract we had in the cabinet)

1 3/4 c. sifted flour (I went with my staple: whole wheat pastry flour)
3/4 tsp. salt
1/2 tsp. baking soda
1 c. shredded coconut (the brand I used this time was Fancy Flake Coconut (Sweetened) from Albertsons)

Directions:

1.) With spoon, work shortening against sides of bowl till creamy. Add sugar gradually working in till fluffy.

2.) Add egg, flavorings, blend. Sift together next 3 ingredients. Add gradually with coconut to first mix.

3.) Turn onto waxed paper (or plastic wrap). Form into 2 in. roll (basically, a log that's 2 inches high. This can be a bit tricky--if the dough is too dry some of the pieces fall off. You can either add a little more liquid, or just use the "fallen" dough for taste testing). Wrap in paper (again, plastic works well too). Chill several hours or overnight.


4.) Cut into 1/8 to 1/4 inch slices (I used a serrated bread knife but had a little trouble with fallen dough again). Bake on greased cooky sheet (I prefer using parchment paper instead of the greasing) in mod oven 375 -- 12 minutes or more (I cut back to about 8 minutes for most of them since the coconut flakes sticking out started to brown quickly).

I also cooled these cookies on their baking sheet for five minutes before transferring to a wire rack to cool completely. That's it!

I love that this mysterious home cook/recipe writer abbreviates and keeps things simple as much as I do! The use of "till" and "cooky" was adorable, though I did have to analyze her (I'm assuming "her") cursive handwriting (a lost art) for several minutes to decipher "mod oven."  Could that be "med" oven? "Mool" oven? I still wouldn't be quite sure if it wasn't for other recipes in the cookbook calling for a "moderate oven," which I'm assumed meant "not too hot" (Further research determined it to mean between 325 and 375 degrees).

But back to the results--quite pleasing indeed!  The texture of these cookies turned out to be light but with a sturdy crunch. They're sweet, but the overwhelming lemon flavor helps to balance that out (and when rolling the dough into a log, I seriously could not stop eating the fallen pieces). The coconut was a nice touch that gives these cookies just a little something extra.

Best of all, the recipe was so easy! Aside from having to wait a few hours for the dough to chill in the fridge (and now I would also recommend letting it come to room temperature before slicing to hopefully keep the dough more together) this really takes no time at all. Thank you mysterious home cook/housewife/magical recipe collector! Our paths will surely cross again as you've given me an excellent treasure trove to dig into.

Saturday, May 12, 2012

Dirt Cup Pudding


Before the heat of summer rolls around we can still all enjoy the fun activities that spring has to offer! For some people, spring is the time for planting flowers in the dirt. For me, it was making "dirt cups" for kids at the public library to go with our "Spring" story time theme on March 31!

On the agenda for story time was reading There was an Old Lady Who Swallowed Some Bugs by Johnette Downing, When Will It Be Spring? by Catherine Walters, and Diary of a Worm by Doreen Cronin. We also planted our own Morning Glories in a real cup of dirt before ending the program with a much tastier kind of "dirt!" I promise, this pudding is not as "gross" as it looks!

Dirt Cup Pudding

Ingredients:

2 cups cold milk
1 small package (3.4 oz.) chocolate pudding mix (I used JELL-O brand)
8 oz. whipped topping (like Cool Whip), thawed, not frozen
16 oz. crushed Oreo cookies (I crushed them by hand by pouring them into a large zipped-top plastic baggie)
10 gummy worms and 10 clear cups

Directions:

1). Mix the pudding and milk together in a large bowl. Let sit 5 minutes.

2). Stir in the whipped topping and half the crushed cookies.

3). Drop about 1 teaspoon of crushed cookies into each clear cup. Fill 3/4 of the way full with the pudding mixture. Top with the rest of the cookies.

4). Refrigerate at least one hour (if possible). Garnish each cup with a gummy worm and eat up with a spoon!


Special thanks to Cooks.com for helping me find the perfect dirt cup recipe to try and to all the Saturday Drop-In story time kids at the library who were my eager taste testers!

Easter Treats--2012!


For me, holidays are all about tradition. Family, of course, and tradition, and often times religious backgrounds. I know the true reason Easter exists, but I'm here today to talk about the foods it has inspired me to make from such secular traditions as honoring the iconic animals that have come to symbolize a holiday right smack in the beginning of spring. How could I not dye eggs and bake something for bunnies? Thus I present to you first my recipe for Colored Easter Eggs (my traditional go-to every year) and then a new attempt using a box mix (gasp--yes, I was in a hurry) to create Carrot Cake Muffins.

Colored Easter Eggs

Ingredients:

1 teaspoon white vinegar
Hot tap water
Food coloring

Directions:
1.) Fill paper cups about 2/3 of the way full with hot tap water. Add the vinegar and stir.

2.) Place 10-20 drops of food coloring into each cup, stir again, and carefully submerge your egg into the colored water. To get the exact shade of a color you'd like, follow the number of drops recommended on the back of the box. My favorite brand is McCormick, and their food coloring drop tips can be found here.

3.) Leave in 5-10 minutes depending on how dark you want your colors to be. Carefully remove each egg with a plastic spoon and store in the egg carton. Refrigerate overnight and enjoy on Easter morning!

Carrot Cake Muffins

Ingredients:

1 cup hot tap water
1 pouch of carrots and raisins (it comes in the box)
2 eggs
1 stick softened butter
1 cup oats

Directions:

1.) Follow the directions on the box for "Carrot Cake Cookies" but place in a muffin tin lined with paper cupcake liners instead (my cookie attempt did NOT end up tasting as delicious as when I put these into muffin form). First preheat the oven to 350 degrees and rehydrate the carrots and raisins by soaking them in the hot tap water for about 5 minutes. Drain and pat dry with paper towels. 

2.) In a large bowl, combine the cake mix, butter and eggs, stir in the oats, then stir in the carrots and raisins.

3.) Fill the muffin cups about 3/4 of the way full and bake approximately 12-15 minutes before removing from oven to cool.

Despite the "cookie" recipe, these really did taste best in muffin form. No frosting necessary--they were already quite sweet on their own. And, of course, presentation is everything. I used the Wilton brand Pink Petal baking cups as paper liners to make my muffins look like garden flowers. In the end, both my families (the one at home and the one at the library) were able to enjoy my favorite holiday tradition of all--sharing and eating delicious food together.

The back of the box--recipe at the bottom!


My cookie attempt--in the shape of carrots...kind of....

A beautiful garden!

Sunday, April 15, 2012

Sour Cream Cheesecake


Yes, I am lactose intolerant. So, yes, as a general rule, I cannot eat such delicious foods as cheesecake--or pretty much anything with the words "cheese" or "cream" somehow buried in them. This is not to say I don't occasionally tempt fate, in very small portions, especially for the sake of dear friends, and with the help of a Lactaid pill. But you don't want to know about my dietary deficiencies. You want to know how to make that delectable-looking slice of heaven that even this non-dairy eater here is raving about from the minimal sliver she used for taste testing.

I owe this one to my dear friend Janice (that's her in the picture under step 2) who wanted to try out a recipe that another friend gave her. We've often created baking experiments together, and it's always fun to teach and learn and just spend time together--especially when it results in delicious food. So dairy product or no, I was gung-ho to try out her friend's recipe labeled "Cream Cheese Pie."  Accidentally glossing over the word "pie" on the paper she handed me, I baked both our Sour Cream Cheesecakes in cake pans (we doubled the recipe to make one for each of our families). This essentially created an easy cheesecake recipe (because cheesecakes are actually rather complicated to make under normal circumstances--they require hot steam baths to prevent cracking and everything!). But whatever you call it, and however you vary the recipe, it's still going to taste great and be a fun project to put together with friends!

Ingredients:

For crust:
1 and 1/2 cups graham cracker crumbs
1/3 cup melted butter
1/4 cup sugar

For filling:
2/3 cup sugar
1 teaspoon vanilla
8 ounces light cream cheese (softened)
1/4 teaspoon salt
2 eggs

For topping:
2 cups light sour cream
1/4 cup sugar
1 teaspoon vanilla

Directions:

1.) Preheat the oven to 325 degrees. Crush a box of graham crackers to create crumbs (we crushed ours by hand in plastic baggies). Mix crumbs, butter and sugar together, saving a few crumbs for the topping. Press the mixture into the cake pan, bake 8 minutes, then remove from oven to cool.


2.) In a bowl, beat the eggs, then add the sugar, vanilla, cream cheese and salt. Combine everything with an electric mixer until the mixture is smooth. Pour the mixture on top of the crust and bake 20 minutes.


3.) Let the cheesecake cool while making the topping: mix together the sour cream, sugar and vanilla, along with remaining crumbs. Pour on top and bake another 10 minutes. (I also accidentally glossed over the fact that the crumbs in the original recipe are supposed to go on the very top of the cake, not inside the topping mixture. But, oh well, this does not affect flavor--only presentation. See below).

4.) Cool the cheesecake completely before refrigerating at least 30 minutes, though overnight is best.

Using the light cream cheese and sour cream makes this one just a touch healthier than most cheesecakes, and I believe made it slightly easier for my tummy to digest. Don't let the three different mixtures (crust, filling, topping) scare you away from a relatively easy recipe that's still under five steps to make! Thank you Janice, and thank you Janice's friend!

Next up, my Easter escapades!

Monday, March 26, 2012

Donuts, Part Deux


While I preferred the taste of my first attempt at donuts--Bacon Cake Donuts that didn't quite taste like bacon but were still so delicious--I did prefer the look (i.e., the toppings) of my second donut attempt shown here. In this second attempt at baked (not fried!) dough, I pretty much just followed Wilton's Baked Cake Donut recipe on the back of my pan, except I doubled the amount of batter so I could have enough treats for my family and my coworkers. They were tasty, but I think the addition of a little bacon grease and brown sugar instead of white sugar really made a difference in the overall flavor (and color--this week's caked donuts turned out rather pale underneath the toppings). However, my second donut attempt still received many compliments and make a nice treat for anyone--especially with chocolate and sprinkles on top!

So if you'd like to recreate the recipe, I'll still share what I did below. The recipe for an awesome chocolate topping--also from the Wilton's donut pan but with a little more chocolate--follows!

Chocolate Cake Donuts

Ingredients:
4 cups cake flour, sifted
1 and 1/2 cups granulated sugar
4 teaspoons baking powder
1/2 teaspoon ground nutmeg
2 teaspoon salt
1 and 1/2 cups buttermilk
4 eggs, lightly beaten
4 tablespoons butter, melted

Directions:

1.) Preheat the oven to 425 degrees. Spray your donut pan with nonstick cooking spray or line a cupcake pan with paper cupcake liners (I got lazy and decided that instead of trying to fill my six-donut pan over and over again, I would make a batch of donut-flavored cupcakes to finish off the batter).

2.) In a very large mixing bowl, sift the cake flour, sugar, baking powder, nutmeg and salt. Add in the buttermilk and eggs. Make sure your melted butter has cooled slightly before adding it last. Beat carefully until all ingredients are just combined--no more flour should be visible, but the batter shouldn't be overmixed.

3.) Fill your donut pan or cupcake liners approximately 2/3 to 3/4 full and bake for about 9-10 minutes (mine still came out pale at 10 minutes even though the original recipe calls for 7-9 minutes. And I did three separate batches in the oven rather than try to fit all my filled tins in there at once, so who knows why they still came out so light?).

4.) Let the donuts cool about 2-5 minutes before prying them gently from the pan with a couple of toothpicks. Place on a wire rack to cool completely before dipping them in a bowl of chocolate glaze and then a bowl of sprinkles. Recipe for Chocolate Glaze is below.

Ingredients:

1/2 cup plus 1/4 cup semisweet chocolate chips
2 Tablespoons unsalted butter
2 Tablespoons light corn syrup

Directions:

1). In a microwave-safe bowl, combine the 1/2 cup of chocolate chips, butter and corn syrup. Microwave on 50 percent power for 50 seconds.

2). Carefully remove the bowl from the microwave (it will be hot--I used potholders) and add the extra 1/4 cup of chocolate chips, stirring while you add. The mixture should turn from thin drizzle to thick frosting consistency. And it tastes as good as it looks!

That's it! But don't forget these key details in the donut-making process:

1. Donuts taste best when fresh. They will get stale quickly when left out and attempted to eat two days later. All is not lost, however, if you want to eat donut leftovers! Place them in an airtight plastic baggie to stave off staleness as long as possible! If all else fails, dip rock-hard donuts in coffee to instantly soften them up!

2. These donuts can be made into cupcakes! Because they rise so much (and because I got lazy), I thought it made perfect sense to try filling a few cupcake liners with donut batter too! It worked! Just be careful peeling off the paper as they tend to stick.

3. The dipping in chocolate and sprinkles is the fun part! I try to get just the right amount of glaze on each one, turning the donuts so they leave a smooth design of chocolate and an evenly spread sprinkling of sprinkles. If you really want to be daring, you can try the chocolate glaze on top of the Bacon donuts mentioned earlier. Use bacon bits instead of sprinkles to top the chocolate and enhance the bacon flavor. Doesn't that sound good?

4. Despite bacon, chocolate, butter and sugar...these donuts are healthy! Somewhat healthy! They're baked (not fried!) and made with all-natural homemade ingredients. So that's a start!

All-in-all, I'd say donuts are a success in my book no matter how you make them. It was a fun experiment for me to try, having never ever made a donut before this month! But I will definitely be baking them again!

Saturday, March 17, 2012

Single-Portion Sugar Cookies!


Happy St. Patrick's Day! While not necessarily known as a typical dessert holiday (like Thanksgiving, Christmas and Valentine's Day for me), I love any excuse to bake anything--even if it turns out green. Especially if it turns out green (my all-time favorite color!).

While I could have picked Irish Soda Bread or even Green Eggs and Ham to make and post about for this occasion, I'm choosing to write about sugar cookies instead. Why sugar cookies? Because they're the most classic holiday cookie you can eat (Chocolate Chip does not count as a "holiday cookie" to me, but rather an "anytime cookie"). Sugar cookies are the proverbial pot of golden deliciousness at the end of the rainbow. And what makes this recipe even more magical is that you can whip up one of these cookies for yourself in an instant! The recipe is individually portioned--an original creation I used at the public library where I work in our quarterly children's baking program this very afternoon!

If you're a regular reader of my blog, or a regular patron/staff member at my library, you may already be familiar with the "Bake With Me" program I set up every season for kids ages 2-6 to get hands-on baking experience with their parents or caregivers. You may have seen how excited and frazzled I get on a "Bake With Me" day, or how proudly I beamed when the program was mentioned two years ago in the national Association for Library Services to Children (ALSC) e-newsletter (scroll about halfway down the page to find the writeup and two more single-portion recipes!). When you combine baking, kids and libraries, how can the results be anything but awesome? I can't help but want to share them!


So even if you've never seen the program, the beauty of this blog is that I can show the same recipe we used so you can recreate the experience with your kids, parents, friends or just you when you're craving a cookie. You don't even have to make it green if you don't want to. Just make it fun!


Shamrock Sugar Cookies


Ingredients:
1/2 Tablespoon butter, softened
1 Tablespoon sugar
1/2 Tablespoon egg or egg substitute (the substitute makes for easier pouring--anything like Egg Beaters will work)
1/8 teaspoon vanilla extract
3 Tablespoons whole wheat pastry flour (That's what I always use, but any flour will do)
1/16 teaspoon baking soda (I just filled a 1/8 teaspoon half full)
1/16 teaspoon salt (Or a pinch. That works too)
6 drops green food coloring

Directions:

1). Preheat the oven to 350 degrees and place a square of parchment (NOT wax) paper on a baking sheet.

2). Use a fork to mush the butter in a small bowl and combine it with the sugar. Add the egg and vanilla, then mix again and set aside. In a slightly larger bowl, combine the flour, baking soda and salt.

3). Add the sugar mixture to the flour mixture. Drop in the food coloring and mix well. At this point it helps to use your hands to knead the dough a little--the green color spreads more evenly that way. Then flatten the dough with your hands and use a shamrock cookie cutter (or any cookie cutter, really) to press out the shape.

4). Bake on the parchment papered baking sheet for about 6-7 minutes, then let cool slightly before eating.

With a wee bit o' luck, you'll end up with a cookie that's quite a charm! Enough to make even the leprechauns green with envy. Enjoy!


Thursday, March 15, 2012

"Donuts, I got Donuts"


If you're a Simpsons TV show fan, go ahead and say it with me: "Mmm...donuts." Or we can sing Chief Wiggum's donut song: "Donuts, I got donuts...."

Don't know what I'm talking about? D'oh! Oh well, just check out the awesome pictures and the recipe below for my first ever attempt at homemade donuts!  Finally, finally, another success!  I owe it all to shopping with my mom at Bed, Bath & Beyond where I swore I wasn't going to buy anything, until I saw it: a shiny, enticing, never-before-owned-by-me donut pan, complete with recipe ideas attached. I happen to absolutely without a doubt love donuts, and absolutely without a doubt never eat them because I don't eat fried foods anymore. Le sigh.

However, one of my favorite types of donuts used to be the glazed "cake" donut (pancakes, shortcakes, birthday cakes--do you see a pattern in my favorite treats?). And everyone knows cake is baked, not fried. (Yay, healthier already!). So I took the Wilton's recipe for standard Baked Cake Doughnuts that came with my new pan, and twisted it up with the one food item I'd been wanting to incorporate into my baked goods forever. The one item I knew could dress up a standard donut recipe and make it shine--or perhaps sizzle. Bacon.

Now these donuts did not turn out overwhelmingly bacon-y in taste (is that good or bad?) so I might have to experiment with adding just a little more bacon grease and bits next time. But the result was still fluffy, sweet, and so delicious.

Bacon Cake Donuts

Ingredients:


2 cups cake flour, sifted
2 teaspoons baking powder
1/4 teaspoon nutmeg
1 teaspoon salt
3/4 cup brown sugar
3/4 cup buttermilk
2 eggs
1 and 2/3 Tablespoons melted butter
1/3 Tablespoon (1 teaspoon) bacon grease
1 teaspoon bacon bits (cooked bacon, chopped)

Directions:


1). Preheat the oven to 425 degrees a spray a donut pan with nonstick cooking spray (or, if you don't have a donut pan, I suppose you could use a muffin tin and see what happens!). In a large bowl, sift together the flour, baking powder, nutmeg and salt.

2). In a separate bowl, combine the brown sugar, buttermilk, eggs, melted butter and bacon grease. (The grease is easy enough to collect from bacon heated on the stove--I used about nine small pieces of precooked Trader Joe's Fully Cooked Uncured Bacon to get a teaspoon of grease, though). It helps if the butter and grease has cooled a little before adding them to the mixture--otherwise they'll curdle the eggs.

3). Add the wet ingredients to the dry ingredients and beat gently until just combined. Bake approximately seven minutes, then remove from oven and let sit at least five minutes before removing from the pan carefully with a couple of toothpicks on the sides of the donuts to turn them out. Let cool slightly, then drizzle with icing or dip in frosting if so desired.

My intention was to create a "Maple-Bacon" breakfast kind of donut, actually, but I just couldn't get my frosting to taste or look quite right. So that's an experiment for another day. Rather than wait until I had a perfect maple syrup frosting recipe concocted before writing this post, I figured I'd best just get it up here and you can either use your favorite canned frosting, try out one of my previous recipes like eggnog frosting or just eat them plain (that's what I did!) with a side of coffee for dunkin'. Tasted perfect to me! You won't have to say "D'oh!" and "Nuts!" separately ever again. Mmm...donuts....