Thursday, May 31, 2012

Coconut Refrigerator Cookies


I love old cookbooks. It's not so much the recipes--because they sure did like to use a lot of lard back then--but really more about the style. Classic '50s illustrations. Faded black and white photos. Sometimes even handwritten directions. At least, if you find an old cookbook at a used bookstore, there's a definitely possibility of unearthing a handwritten treasure. Recall my Beacon Hill Brownies post and you might remember that I once discovered a collection of old recipes hidden together in the pages of a worn, antique cookbook before. So I was delighted upon purchasing The Family Circle Cake and Cooky Cookbook to discover that it, too, contained newspaper recipes from the 1970s, unidentifiable magazine cut-outs and a lovely little handwritten paper detailing how to make Coconut Refrigerator Cookies.


I love coconut! And this tropical fruit is perfect for summer! I had to test this one out (here it is word for word from the paper, with my notes in parentheses or bold).
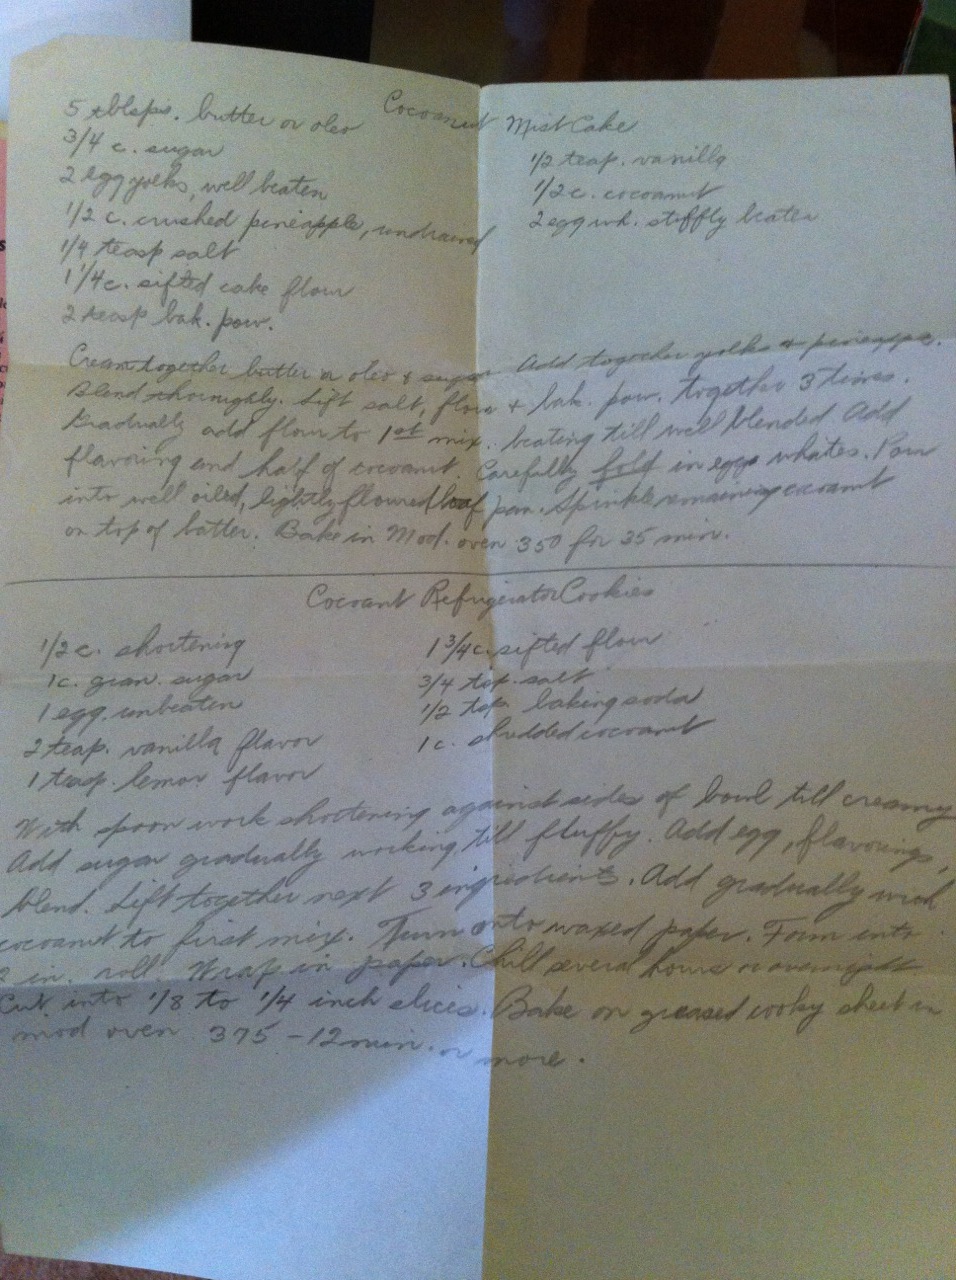
Ingredients:

1/2 c. shortening (I used non-hydrogenated vegetable shortening--NOT lard)
1 c. gran. sugar (granulated)
1 egg, unbeaten
2 teasp. vanilla flavor
1 teasp. lemon flavor (I used lemon extract we had in the cabinet)

1 3/4 c. sifted flour (I went with my staple: whole wheat pastry flour)
3/4 tsp. salt
1/2 tsp. baking soda
1 c. shredded coconut (the brand I used this time was Fancy Flake Coconut (Sweetened) from Albertsons)

Directions:

1.) With spoon, work shortening against sides of bowl till creamy. Add sugar gradually working in till fluffy.

2.) Add egg, flavorings, blend. Sift together next 3 ingredients. Add gradually with coconut to first mix.

3.) Turn onto waxed paper (or plastic wrap). Form into 2 in. roll (basically, a log that's 2 inches high. This can be a bit tricky--if the dough is too dry some of the pieces fall off. You can either add a little more liquid, or just use the "fallen" dough for taste testing). Wrap in paper (again, plastic works well too). Chill several hours or overnight.


4.) Cut into 1/8 to 1/4 inch slices (I used a serrated bread knife but had a little trouble with fallen dough again). Bake on greased cooky sheet (I prefer using parchment paper instead of the greasing) in mod oven 375 -- 12 minutes or more (I cut back to about 8 minutes for most of them since the coconut flakes sticking out started to brown quickly).

I also cooled these cookies on their baking sheet for five minutes before transferring to a wire rack to cool completely. That's it!

I love that this mysterious home cook/recipe writer abbreviates and keeps things simple as much as I do! The use of "till" and "cooky" was adorable, though I did have to analyze her (I'm assuming "her") cursive handwriting (a lost art) for several minutes to decipher "mod oven."  Could that be "med" oven? "Mool" oven? I still wouldn't be quite sure if it wasn't for other recipes in the cookbook calling for a "moderate oven," which I'm assumed meant "not too hot" (Further research determined it to mean between 325 and 375 degrees).

But back to the results--quite pleasing indeed!  The texture of these cookies turned out to be light but with a sturdy crunch. They're sweet, but the overwhelming lemon flavor helps to balance that out (and when rolling the dough into a log, I seriously could not stop eating the fallen pieces). The coconut was a nice touch that gives these cookies just a little something extra.

Best of all, the recipe was so easy! Aside from having to wait a few hours for the dough to chill in the fridge (and now I would also recommend letting it come to room temperature before slicing to hopefully keep the dough more together) this really takes no time at all. Thank you mysterious home cook/housewife/magical recipe collector! Our paths will surely cross again as you've given me an excellent treasure trove to dig into.

Saturday, May 12, 2012

Dirt Cup Pudding


Before the heat of summer rolls around we can still all enjoy the fun activities that spring has to offer! For some people, spring is the time for planting flowers in the dirt. For me, it was making "dirt cups" for kids at the public library to go with our "Spring" story time theme on March 31!

On the agenda for story time was reading There was an Old Lady Who Swallowed Some Bugs by Johnette Downing, When Will It Be Spring? by Catherine Walters, and Diary of a Worm by Doreen Cronin. We also planted our own Morning Glories in a real cup of dirt before ending the program with a much tastier kind of "dirt!" I promise, this pudding is not as "gross" as it looks!

Dirt Cup Pudding

Ingredients:

2 cups cold milk
1 small package (3.4 oz.) chocolate pudding mix (I used JELL-O brand)
8 oz. whipped topping (like Cool Whip), thawed, not frozen
16 oz. crushed Oreo cookies (I crushed them by hand by pouring them into a large zipped-top plastic baggie)
10 gummy worms and 10 clear cups

Directions:

1). Mix the pudding and milk together in a large bowl. Let sit 5 minutes.

2). Stir in the whipped topping and half the crushed cookies.

3). Drop about 1 teaspoon of crushed cookies into each clear cup. Fill 3/4 of the way full with the pudding mixture. Top with the rest of the cookies.

4). Refrigerate at least one hour (if possible). Garnish each cup with a gummy worm and eat up with a spoon!


Special thanks to Cooks.com for helping me find the perfect dirt cup recipe to try and to all the Saturday Drop-In story time kids at the library who were my eager taste testers!

Easter Treats--2012!


For me, holidays are all about tradition. Family, of course, and tradition, and often times religious backgrounds. I know the true reason Easter exists, but I'm here today to talk about the foods it has inspired me to make from such secular traditions as honoring the iconic animals that have come to symbolize a holiday right smack in the beginning of spring. How could I not dye eggs and bake something for bunnies? Thus I present to you first my recipe for Colored Easter Eggs (my traditional go-to every year) and then a new attempt using a box mix (gasp--yes, I was in a hurry) to create Carrot Cake Muffins.

Colored Easter Eggs

Ingredients:

1 teaspoon white vinegar
Hot tap water
Food coloring

Directions:
1.) Fill paper cups about 2/3 of the way full with hot tap water. Add the vinegar and stir.

2.) Place 10-20 drops of food coloring into each cup, stir again, and carefully submerge your egg into the colored water. To get the exact shade of a color you'd like, follow the number of drops recommended on the back of the box. My favorite brand is McCormick, and their food coloring drop tips can be found here.

3.) Leave in 5-10 minutes depending on how dark you want your colors to be. Carefully remove each egg with a plastic spoon and store in the egg carton. Refrigerate overnight and enjoy on Easter morning!

Carrot Cake Muffins

Ingredients:

1 cup hot tap water
1 pouch of carrots and raisins (it comes in the box)
2 eggs
1 stick softened butter
1 cup oats

Directions:

1.) Follow the directions on the box for "Carrot Cake Cookies" but place in a muffin tin lined with paper cupcake liners instead (my cookie attempt did NOT end up tasting as delicious as when I put these into muffin form). First preheat the oven to 350 degrees and rehydrate the carrots and raisins by soaking them in the hot tap water for about 5 minutes. Drain and pat dry with paper towels. 

2.) In a large bowl, combine the cake mix, butter and eggs, stir in the oats, then stir in the carrots and raisins.

3.) Fill the muffin cups about 3/4 of the way full and bake approximately 12-15 minutes before removing from oven to cool.

Despite the "cookie" recipe, these really did taste best in muffin form. No frosting necessary--they were already quite sweet on their own. And, of course, presentation is everything. I used the Wilton brand Pink Petal baking cups as paper liners to make my muffins look like garden flowers. In the end, both my families (the one at home and the one at the library) were able to enjoy my favorite holiday tradition of all--sharing and eating delicious food together.

The back of the box--recipe at the bottom!


My cookie attempt--in the shape of carrots...kind of....

A beautiful garden!