Wednesday, October 21, 2015

Fall Fun Including Pumpkin Donuts!


It's true, I've been a little behind in my blog postings, but that doesn't mean I haven't been ready (as always) for fall (and pumpkin).

One need look no further than my recent grocery store purchases to confirm my commitment to all things pumpkin once late September rolls around. As I happily shared with a fellow pumpkin-loving Facebook friend, this season I've thus far sampled: pumpkin granola, yogurt, cream cheese, cake bars, black coffee (K-cup pods from Target), Starbucks lattes, waffles, pancakes, cereals, and M&Ms (pumpkin spice LATTE flavored).

Fall-themed cereals alone!
Then my mom purchased me this assortment from Trader Joe's:

Not all of these were spot on--I'm less impressed with the Nestle chips.

But the biggest foodie plans for the season revolved around my sort of annual Halloween party get-together of former coworkers (we try to do this every year). I love putting together a menu of fall and spooky-themed items, many of which I've employed in the children's department of the library and many that I've just made up on the spot. Caramel apples were a must, seeing as how I hadn't yet made any caramel apples this fall (and it was October already), and spider cookies (made from Oreo cookies dotted with candy eyes) was a fun delight I'd tried before. Running short of time, I bought a prepackaged Duncan Hines chocolate cupcake mix (dark chocolate fudge if I remember correctly), but I couldn't skimp on something pumpkin flavored. Usually I make a nice Pumpkin Dip with cream cheese, but this time I'd had an idea to do some sort of pumpkin cake for a long time. Inspired by the MyRecipes.com Boo-tiful Pumpkin Cake, I thought I'd go a little smaller scale with Pumpkin Donuts (hey, I had a donut pan and not a bunt cake pan). With a quick Internet search, I found a four and a half-star recipe for Glazed Pumpkin Donuts on AllRecipes.com that I quickly modified for my purposes.

Ingredients:

2 cups whole wheat pastry flour (sifted)
1/2 cup packed brown sugar
1 and 1/2 teaspoons baking powder
1 and 1/2 teaspoons pumpkin pie spice
1/2 teaspoon salt
1/4 teaspoon baking soda
1 cup pumpkin puree (I used Libby's Canned Pumpkin)
2 eggs
1/4 cup of milk (I used Fat-Free Lactose Free Milk)
1/4 cup butter, softened


Directions:

1.) Preheat the oven to 325 degrees and spray your donut pan with nonstick cooking spray (you could try with a muffin pan, but it really helps to have a donut pan to make donuts).

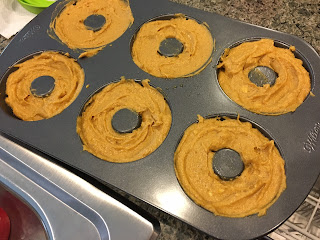
2.) Sift the flour, brown sugar, baking powder, pumpkin pie spice, salt, and baking soda into a large mixing bowl. Add the canned pumpkin, eggs, milk, and softened butter. Stir to combine ingredients (an electric hand mixer on low speed was especially helpful) until the batter is thoroughly combined but not overmixed (just make sure there are no large lumps of butter left. Those were the hardest parts to break down).

3.) Pour the batter into the donut pan, filling almost to the top. Wipe away any excess batter around the edges with a paper towel (this will help the donuts look more uniform later). 


4.) Bake approximately 8-10 minutes (I started with 8 minutes but the donuts were not yet firm when I took them out--they should sort of spring back when touched rather than leave an impression. I baked for an additional 2 minutes until they started to brown around the edges just a tad).

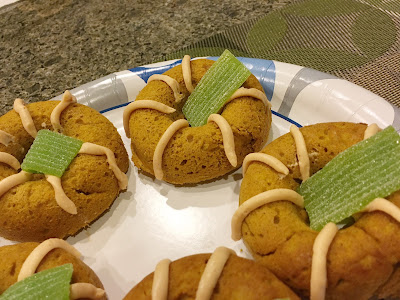
5.) Remove the donuts from the oven and allow to cool to room temperature before removing from the pan (otherwise they will stick to the pan and fall apart). Once the donuts are completely cooled, flip them over and frost them any way you like. I used Philadelphia Pumpkin Spice Cream Cheese spooned into a plastic baggie with the tip cut off so I could draw little gourd-shaped lines on the donuts.


Optionally, you can also add a piece of green licorice (I used green apple Rips) to make a stem, though the licorice will make the rest of the donuts smell like green apple when you store them in the fridge. Yes, I learned all these the hard way.

I have to admit, despite my obvious bias to all things pumpkin, these were my favorite treats of the Halloween evening. They came out moist--even after being refrigerated overnight--paired well with the cream cheese, had a lovely flavor, and offered a nice contrast to all the chocolate on my table.


What other fall things have I baked lately and not blogged about? I admit, the list is limited to JELLO Jigglers attempted in a pan meant for cakes (miraculously, it worked!). But for me, Halloween is the big event of the season...until Thanksgiving and pumpkin pie comes along....



Thursday, June 25, 2015

Nutella Brownies


Oh yes. You read that right. Nutella. And brownies. In the same sentence. In the same recipe. I must admit that I'd never really tried Nutella, though I've heard great things about it, especially from Italian chefs who cook with hazelnuts. Then one day I was scrolling through my Facebook newsfeed and saw one of those short recipe videos start to play: Three-Ingredient Nutella Brownies. I do like to keep things short and sweet, though I tend to get a bit skeptical of recipes with very few ingredients. Is it really possible to turn just three things into brownies? And awesomely delicious brownies at that? I had to experiment to find out.

When the time came to host a girls' movie night with my friends, I knew I had to make some kind of delicious dessert. I knew it had to be easy--I wouldn't have much time after work to prepare--and it had to be chocolate (Hey, what else would you pair with popcorn and wine?). What a perfect time to test out Nutella Brownies! I bought a jar of Nutella two days before the event and decided to bake the brownies the night before just in case it turned out that Nutella plus eggs plus flour did not equal delicious.

I didn't need to be worried.

Ingredients:

1 and 1/4 cups Nutella (chocolate-hazelnut spread. I used a whole 13 oz jar)
2 eggs
1/2 cup flour (as per usual, I used whole wheat pastry flour)

Directions:

1.) Preheat the oven to 350 degrees. Pour the entire jar of Nutella into a mixing bowl. Add the eggs and flour (sifted in if possible) and stir until all ingredients are combined. Caution: it will be thick.

2.) Pour the brownie batter into a square brownie pan that's been sprayed with nonstick cooking spray (the recipe from the video used a 9x13-inch cake pan, but I prefer squares for brownies and didn't think I had enough batter to fill a rectangle anyway).

3.) Bake for about 15 minutes. Remove the brownies from the oven to cool before cutting (you can also refrigerate them overnight and cut the next day).

These brownies may be a little low (no baking powder or soda to help them rise). They may be a little gooey (but that's personally my favorite kind). They will definitely be delicious.

So the main question that remains is, why wasn't I introduced to this delicious flavor of chocolate and hazelnut before?? I'm not a big chocolate person, but I am a big nut-butter person. Nutella seems to be the best of both worlds (I definitely licked my spoon after emptying the jar, and pretty much scraped the jar clean...). The brownies were a hit at movie night and I plan to repeat any recipes that are this easy to put together (so long as I keep my pantry stocked with Nutella. Shouldn't be hard).

Experiment success!

Wednesday, June 24, 2015

Go-To Banana Muffins!


I officially have a go to banana muffin recipe!  After many attempts to find the perfect combination, I realized that I could adapt my Spring Banana Bread recipe into muffin form and have since made Go-To Banana Muffins several times for parties, work events, and even gave the recipe as a bridal shower present. All I had to do was change brown sugar to white sugar, cut the baking time back, and add in chocolate chips or nuts as needed.

Ingredients:

2-3 very ripe bananas
1/3 cup melted butter
1 cup white sugar
1 egg
1 teaspoon vanilla extract
1 teaspoon baking soda
Pinch of salt
1 and 1/2 cups of whole wheat pastry flour
1 cup chocolate chips (or combination of chocolate chips and pecans, etc.)

Directions:

1.) Preheat the oven to 350 degree and line a muffin tin with paper (cupcake) liners. Spray lightly with cooking spray if the paper is strong enough.

2.) In a single bowl, mash the bananas with a fork, then stir in the melted butter, baking soda, and salt. Add the sugar, egg, and vanilla. Sift in your flour last, folding it slowly so that the flour fully incorporates into the mixture. Do the same for the chocolate chips, folding slowly until fully incorporated.

3.) Pour the batter into the muffin cups and bake for about 18 minutes (25 at the most, but 18 worked for me). Use a toothpick inserted into the center of a central muffin to check for doneness (if it comes out moist with crumbs on it, the muffins might need a little more time. If it comes out dry, you're good). Cool slightly, but serve warm. (Note: They also taste great cold since they're moist enough to not harden in the refrigerator, or they can be reheated in the microwave to maintain the original flavor).

I've received so many positive reviews for these muffins, and I absolutely love bananas, so I'll definitely be returning to this recipe over and over again!

Sunday, March 22, 2015

Spring Banana Bread


It's the first weekend of Spring, and I've finally gotten caught up on this blog for the months I've missed. Though I didn't plan any specific baking for the new season, I felt like whipping up something in my kitchen again, and overripe bananas were just the inspiration I needed to make banana bread.

I've made many a banana bread in the past: Banana Pecan Muffins, Buttermilk Banana Bread, Banana Chocolate Bread, and even a failed attempt at Banana Muffies. All of them ended up tasting fine, but none were quite strong enough to be my "go-to" recipe every time (at least, not as memorable as I would have liked them to be). Thus, I turned to the Internet for help--especially since I had no buttermilk on hand and needed a recipe without it. One of the first results was a banana bread recipe from Simply Recipes that had no dairy other than butter and was advertised as "the most popular recipe on Simply Recipes, first posted 2005." Sounded like good reviews to me.

The execution of the banana bread was easy--I had all the ingredients on hand and could gather them quickly. I felt like making a loaf of bread rather than muffins, so I followed the original recipe, but decided to add brown sugar instead of white sugar for a little molasses flavor sweetness (And of course, I used my traditional whole wheat pastry flour in place of all-purpose).

Ingredients:

2-3 very ripe bananas, peeled (I had two small ones on hand)
1/3 cup melted butter
1 cup of sugar (I used brown sugar)
1 egg
1 teaspoon vanilla extract
1 teaspoon baking soda
Pinch of salt
1 and 1/2 cups of whole wheat pastry flour

Directions:

1.) Preheat the oven to 350 degrees and spray a metal or ceramic loaf pan with nonstick cooking spray.

2.) In a single bowl, mash the bananas with a fork, then stir in the melted butter, baking soda, and salt. Add the sugar, egg, and vanilla. Sift your flour last, folding it in slowly so that the flour fully incorporates into the mixture.

3.) Pour the batter into the loaf pan and bake for about 45-55 minutes (The original recipe calls for an hour to an hour and 10 minutes, but my bread browned up just a little too much after 53 minutes. I forgot to check it earlier as the Simply Recipes method suggested). Use a toothpick inserted into the center of the bread to check for doneness (if it comes out moist with crumbs on it, the bread might need a little more time. If it comes out dry, you're good). Cool completely, remove from pan, and slice to serve.

Sadly, this banana bread came out a little more done than I had planned, dark brown across the top, but with a nice crunchy crust that was still appealing. And even though I waited until the bread had cooled before cutting it, the slices came out more than a little crumbly, making it harder to serve. I decided against bringing it to brunch, for fear of the slices falling apart. However, here at home my family and I have been perfectly satisfied munching on the pieces. Flavor wise, this recipe delivers. A warm slice with butter on top made for the perfect tasty snack, and even the crumbling slices were a nice combination of crunchy on the top but soft in the center. So I'll definitely give this recipe another go, perhaps with a few tweaks and a little less bake time, to see if it's the banana bread keeper I've been looking for.


Catch Up Time

Wow, it's been a long time since I've blogged a new recipe, mostly because my baking lately has been recipes I've posted before. That, and a busy work schedule and a few trips out of town kept me from baking as much as I used to. But that's no excuse not to share delicious food and get back on schedule with seasonal recipes! As my latest banana bread is baking in the oven, I'm going to take a moment to catch up on the various recipes I've made throughout the winter season, concluding with Spring Banana Bread on my next post! So stay tuned....

Catch Up:

October
After making Pumpkin Spice Lattes multiple times this fall, I proceeded to decorate my house for Halloween, enjoy a boisterous football season, attend the local Aki Matsuri festival (autumn Japanese festival), and make Halloween treats for my friends in a gathering much smaller than the famous party of 2012, but just as fun! I also carved a pumpkin and made toasted pumpkin seeds on Halloween Day.


November
The month of November brought about a wonderful vacation to visit my grandfather, his new wife, and my aunt and uncles in south Texas. While there was obviously no time for baking away from home, I enjoyed authentic Mexican food close to the border, as well a BBQ, burgers, and free hotel breakfasts. Later that month I went on a second trip, this time with my boyfriend's family to whale watch at Newport Beach. Though it was just a weekend trip, I was able to enjoy a couple of nice meals and see live dolphins to boot! Oh, and what about Thanksgiving? I made my traditional pies (pecan, pumpkin, and sweet potato!), as always, and spent Thanksgiving evening with my boyfriend's family--a second feast of authentic Filipino cuisine!


December
I can't have Christmas without baking. This month I made savory scones and artichoke dip for my holiday party at work, then Christmas cookies (from store-bought dough), pies, and other snacks for another gathering with friends, celebrated the 90th birthday of my boyfriend's grandmother with lots of food and fun, made Mickey waffles for breakfast, had one final Christmas gift exchange party, and baked my traditional cinnamon rolls for breakfast on Christmas morning. I also tried a scorpion chili pepper for the first time--spicy but not unbearable!


January
New Year's parties brought more food, while the month of January was also my older brother's birthday, and a sushi outing! I tried a new breakfast diner in town, ramen, buffets, and made both pizza and French Toast without a recipe. You probably think all I do is eat out and...eat.


February
In the beginning of February I enjoyed the Super Bowl by eating a Super Bowl of ice cream and cookies. Then there was an early Valentine's Day lobster dinner with frozen yogurt. Next, my mom's birthday, followed by my boyfriend's birthday. February is also the month of my friend's birthday and my late grandmother's birthday, so we had celebrations for each. On Valentine's morning I made heart-shaped pancakes with a chocolate chip border using my traditional pancake recipe.


March
March brought about going away parties for my friend, my first 5K, and a St. Patrick's Day where I wore green but sadly didn't bake anything green! I did, however, make bibingka and halo-halo for the going away party. I spent the rest of the month celebrating Pi Day (3/14/15) with my mom's coconut banana cream pie, and Macaron Day with macarons. I also baked chocolate chip cookies for two different occasions using my favorite Pillsbury dough from Sam's Club. Yes, despite the delays in posts, I have actually done some baking! Oh, and there were some ice cream adventures in between (like dark chocolate ghost pepper gelato shown in the last picture--eaten just last night!).


So you're finally all caught up with my food adventures (if you were wondering where I've been all this time). And now, back to my not-so-regularly-scheduled blog programming. Thanks for staying with it!